Mold On Bathroom Ceiling: Easy Removal And Prevention Tips
TL;DR: To remove mold from bathroom ceilings, first identify whether it’s mildew or black mold. Mildew is easier to treat, while black mold may require professional help. Improve ventilation by installing a fan with at least 60 CFM or opening windows. Clean using a 50/50 solution of water and bleach, or use white vinegar for porous surfaces. For stubborn mold, try Odoban soap concentrate, letting it soak for 15-30 minutes before scrubbing with a hard-bristled brush. Wear an N95-rated mask for protection. After cleaning, ensure the area is completely dry. Apply a mold-resistant primer like Kilz, followed by anti-mold paint or Zinsser Perma-White. To prevent recurrence, maintain humidity below 60% using products like Damp Rid or a dehumidifier. Run exhaust fans for at least 30 minutes after showering. For extensive mold (over 10 square feet) or suspected toxic black mold, consult professionals. Regular maintenance with products like Concrobium Mold Control, Microban, or Mold Armor can help prevent future growth. Consider PVC cladding for long-term mold resistance on bathroom ceilings.
Black spots on bathroom ceilings are a common issue for many homeowners. These spots are often mold, which can turn a bathroom from a place of relaxation into a potential health concern. However, there are effective ways to address this problem. Mold can appear in corners or spread across larger areas, but it’s possible to remove it with the right approach. This guide will provide step-by-step instructions on how to kill and permanently remove mold from a bathroom ceiling. We have also given some prevention tips so that you can keep your bathroom mold-free in the future.
What Causes Mold On Bathroom Ceiling?
Mold on bathroom ceilings is primarily caused by high moisture levels, warm condition in bathroom, inadequate ventilation, and insufficient cleaning. In the bathroom, the constant use of water creates an ideal environment for mold growth. Areas around showers, bathtubs, and sinks are frequently exposed to moisture, and if these areas are not properly dried or ventilated, mold can easily develop. The spores settle on surfaces where there is consistent dampness and a food source, such as ceiling tiles, drywall, paint, and even dust.
When you take a hot shower, the steam rises, collides with the cooler ceiling surface, and condenses, creating a damp environment. This moisture, combined with the room’s warmth, forms a perfect breeding ground for mold spores to settle and multiply. For instance, after a 10-minute hot shower, your bathroom’s humidity levels can skyrocket to 90% or more, far above the 50% threshold where mold thrives.
Poor ventilation in the bathroom exacerbates this issue by trapping moisture. Without proper air circulation, the humid air lingers, giving mold ample time to establish colonies. You can easily test your bathroom’s ventilation by placing a piece of toilet paper against the running exhaust fan. If the paper doesn’t stick, it indicates inadequate airflow which signals that your your fan might need an upgrade or repair.
Hidden water sources in the bathroom can equally be problematic for mold on the bathroom ceiling. Leaky pipes, roof issues, or poor insulation can create damp spots that aren’t immediately apparent. These concealed moisture pockets become breeding grounds for mold. For example, a small roof leak might manifest as a persistent mold spot in a ceiling corner, indicating a larger underlying issue.
Insulation problems contribute significantly to mold growth on bathroom ceiling. Poorly insulated areas on your bathroom ceiling can create cold spots where warm, moist air condenses. This temperature differential leads to constant moisture accumulation, providing an ongoing water source for mold. In older homes, where insulation may have degraded or been improperly installed, this issue is particularly common.
The materials used in your bathroom can either help or hinder mold growth. Using the wrong type of paint, for instance, is akin to rolling out a welcome mat for mold. Standard paints or porous options like PVA lack the necessary moisture resistance, allowing water to seep in and create a habitable environment for mold. Specialized bathroom paints, on the other hand, contain mildewcides and offer better moisture protection.
Even your cleaning habits can inadvertently contribute to mold growth. Soap scum and body oils, if not properly cleaned, can accumulate on surfaces and provide nutrients for mold spores.
| Causes | Explanation |
|---|---|
| High moisture levels | Constant use of water in the bathroom creates a humid environment conducive to mold growth. |
| Warm conditions in bathroom | Steam from hot showers increases humidity and creates a warm environment ideal for mold spores. |
| Inadequate ventilation | Poor air circulation traps humid air, allowing mold to thrive in damp conditions. |
| Insufficient cleaning | Accumulation of soap scum and body oils provides nutrients for mold growth. |
| Hidden water sources | Leaky pipes, roof issues, or poor insulation create hidden damp spots ideal for mold. |
| Insulation problems | Poorly insulated areas on bathroom ceilings create cold spots where warm, moist air condenses, promoting mold growth. |
| Improper choice of materials | Using materials like standard paint that lack moisture resistance can facilitate mold growth. |
| Delayed repairs | Failure to promptly fix leaks or other issues can allow mold to establish and spread. |
Are There Specific Materials That Are More Resistant To Mold In Bathrooms?
Materials that are more resistant to mold in bathrooms typically include non-porous surfaces and those treated with antimicrobial properties. Mold thrives on moisture and organic materials. Therefore, choosing materials that do not retain moisture and are less likely to provide a food source for mold spores is essential. For instance, bathroom fixtures and surfaces such as sinks, toilets, and faucets, when regularly cleaned and maintained, can help prevent mold growth.
Mold commonly grows on porous materials such as paper products, cardboard, ceiling tiles, and wood products, as well as in dust, paints, wallpaper, insulation, drywall, carpet, fabric, and upholstery.
Materials like ceramic tiles, glass, and certain types of treated metals are naturally resistant to mold due to their non-porous nature, making it difficult for mold spores to penetrate and establish a colony. Additionally, materials specifically designed with antimicrobial properties can offer enhanced resistance. For example, antimicrobial sink fixtures and bathroom accessories are designed to inhibit the growth of mold and other microbes.
Another effective strategy is using mold-resistant drywall, commonly known as green board or cement board, especially in areas prone to moisture exposure. These drywall options have water-resistant properties that make them more suitable for bathroom installations compared to traditional drywall.
Is Mold On Bathroom Ceiling Dangerous?
Mold on bathroom ceilings can be dangerous in terms of both structural damage and your health issues. Black mold can be particularly stubborn and may need professional help to remove. Often, mold growth points to a hidden water problem, like a leaky pipe or roof. This needs immediate fixing.
Mold doesn’t just look bad – it can spread quickly and cause health issues. Sometimes, cleaning isn’t enough. You might need a thorough mold inspection to check if the mold has gotten into the building structure. If you’re renting, your landlord should handle mold problems.
Regular cleaning helps prevent mold, but once it’s there, it can be risky to your health. Exposure to mold can trigger allergic reactions, respiratory problems, and other health concerns, particularly in children, elderly individuals, and those with compromised immune systems.
How To Remove Mold From Bathroom Ceiling?
Here are the steps to remove mold from bathroom ceiling:
1. Identifying The Problem
Mold aften appears as dark spots or fuzzy patches in various colors, with black mold being particularly concerning due to its potential health risks.
Common signs of mold growth include:
- Peeling paint
- Warping wood
- Water spots
- Persistent musty odor
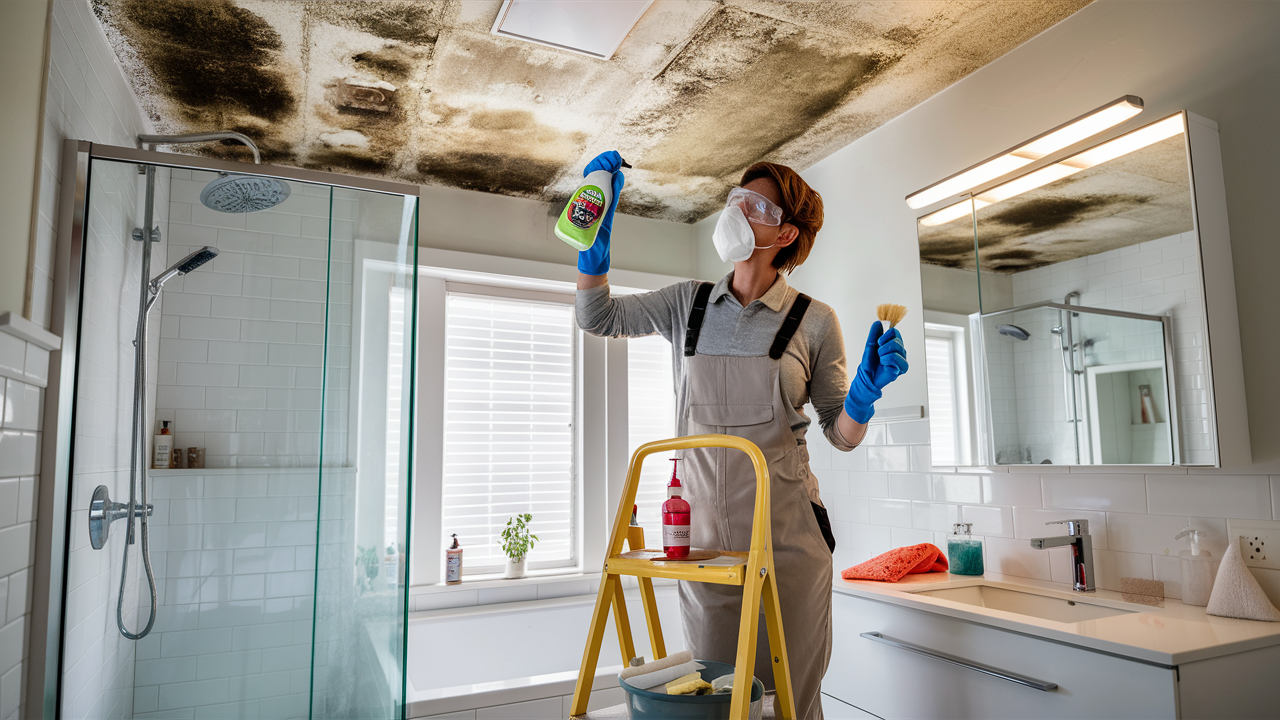
2. Gather Tools And Safety Equipment
Here’s a compilation of safety equipment, mold removal items, and tools that are essential for reducing exposure and simplifying the mold removal process:
- N95 rated breathing mask or higher
- Protective gloves
- Safety goggles
- Spray bottle
- Rubber gloves
- Breathing mask
- Goggles
- Soft brush or toothbrush
- Clean cloths or rags
- Ladder
- Dehumidifier
- Hygrometer
- Detergent solution
- Baking soda
- Plastic sheeting
- Duct tape
- Vacuum with HEPA filter or externally exhausted vacuum
3. Prepare Cleaning Solutions
Various cleaning solutions can be used to effectively remove mold from the bathroom ceiling. Each solution has its unique properties and application methods. You can choose any one of the following cleaning solutions based on your preference and availability of materials to remove mold from bathroom ceiling:
- Bleach Solution: A 50/50 mix of water and bleach.
- Vinegar Solution: Fill a spray bottle with undiluted distilled white vinegar.
- Baking Soda Solution: Mix one teaspoon of baking soda with two cups of water in a spray bottle.
- Hydrogen Peroxide: Use a 3% hydrogen peroxide solution.
- Tea Tree Oil Solution: Mix two teaspoons of tea tree oil with two cups of water or vinegar.
- Lemon Juice: Use full-strength lemon juice.
| Cleaning Solution for mold removal on ceiling | Purpose | Preparation | Application |
|---|---|---|---|
| Bleach Solution | Killing mold and disinfecting surfaces | 50/50 mix of water and bleach | Spray, let sit for several minutes, scrub, rinse |
| Vinegar Solution | Natural, non-toxic, killing mold | Undiluted distilled white vinegar | Spray, let sit for 1 hour, scrub if necessary |
| Baking Soda | Scrubbing mold stains and residues | 1 tsp baking soda with 2 cups water | Spray, scrub with brush, wipe with wet cloth |
| Hydrogen Peroxide | Natural cleaner, killing mold | 3% hydrogen peroxide solution | Spray, let sit for 15 minutes, wipe or rinse |
| Tea Tree Oil | Antimicrobial properties | 2 tsp tea tree oil with 2 cups water/vinegar | Spray, let sit for 1 hour, wipe or scrub |
| Lemon Juice | Eliminating mold due to acidic content | Full-strength lemon juice | Spray or apply, scrub immediately |
4. Remove Molds From Bathroom Ceiling
To effectively remove mold from your bathroom ceiling, follow these detailed steps.
- Isolate the Area: To prevent mold spores from spreading to other parts of the house, isolate the bathroom. Use plastic sheeting to cover doorways and vents, securing the edges with duct tape.
- Vacuum the Area: Using a vacuum cleaner equipped with a HEPA filter or an externally exhausted vacuum, thoroughly vacuum the moldy area. This helps to remove loose mold spores from the surface and prevent them from becoming airborne during the cleaning process.
- Clean the Surface: Prepare a detergent solution by mixing detergent with water. Use a clean, wet rag to scrub the moldy area on the ceiling. Ensure you clean thoroughly but avoid soaking the ceiling, as excessive moisture can damage the material further. For tougher stains, you can use baking soda mixed with water to scrub the surface gently. You can try other mold cleaning solutions we listed in above table. You can also try commercial mold removing products like Concrobium mold killer spray, Kilz mold and mildew primer, and Microban.
- Rinse and Dry: After scrubbing, rinse the cleaned area with a clean, wet rag. Ensure all detergent residues are removed. Quickly dry the area using a fan or a dehumidifier to prevent moisture from accumulating and causing mold to regrow.
- Dispose of Contaminated Materials: Carefully remove and dispose of any materials used during the cleaning process, such as rags and plastic sheeting, to avoid recontamination. Place them in a sealed plastic bag and discard them appropriately.
- Check and Repair Leaks: Inspect the bathroom ceiling for any signs of leaks or moisture intrusion. Repair any leaks in the roof or plumbing to prevent water from entering the ceiling and creating conditions favorable for mold growth.
We have a quite comprehensive guide on mold remediation process. Be sure to check that out.
5. Take Preventive Measures
To prevent mold from returning, you should implement preventive measures. This includes improving ventilation, controlling moisture, and regular cleaning.
To improve ventilation in bathroom:
- Upgrade your exhaust fan to a model with a timer switch or humidity sensor.
- Ensure the fan vents outside the house.
To control moisture:
- Use products like Damp Rid to absorb excess moisture and prevent mold from returning.
- Use a dehumidifier to reduce humidity levels in the bathroom.
- Regularly monitor humidity levels with a hygrometer.
How To Remove Mold From Textured Or Popcorn Bathroom Ceiling?
To remove mold from a textured or popcorn bathroom ceiling, follow these detailed steps to ensure effective and safe cleaning:
- Identify and Address the Source: Improve ventilation, fix leaks, and ensure the bathroom is dry. Inadequate ventilation, such as a non-working exhaust fan, contributes to mold growth.
- Protect Yourself: Wear protective gear such as a respirator mask, gloves, and eye protection. Mold spores can be harmful when inhaled.
- Prepare the Cleaning Solution: Mix a bleach solution using one cup of bleach in a gallon of water, or use a mold-specific cleaner like RMR-86 Instant Mold and Mildew Stain Remover Spray.
- Apply the Solution: Spray the cleaning solution generously on the mold-affected areas. Let it sit for at least 15 minutes to kill the mold spores.
- Scrub the Ceiling: Use a soft brush to gently scrub the ceiling, ensuring you reach into the textured surface without damaging it. For popcorn ceilings, avoid aggressive scrubbing to prevent potential asbestos fibers from becoming airborne.
- Dry the Area: Rinse the ceiling with clean water and dry it thoroughly using a dehumidifier or fan to prevent moisture build-up.
- Persistent Mold: If mold persists, consider applying a mold-killing primer like Kilz Mold & Mildew before repainting with a mildew-resistant paint.
- Encapsulation: For stubborn cases, encapsulate the mold by cleaning, priming with a mold-killing primer, and repainting. This seals the mold and prevents further growth.
- Ongoing Prevention: Regularly maintain low humidity levels in the bathroom by using a dehumidifier and ensuring proper ventilation. Keep the bathroom dry and well-ventilated.
How To Remove Mold From Bathroom Ceiling Without Bleach?
To remove mold from a bathroom ceiling without bleach, use natural cleaning solutions like undiluted distilled white vinegar, baking soda mixed with water, hydrogen peroxide (3% solution), tea tree oil mixed with water or vinegar, or full-strength lemon juice. Apply the chosen solution, let it sit, scrub, rinse, and dry thoroughly.
How To Remove Mold From Bathroom Ceiling With Vinegar?
To remove mold from a bathroom ceiling with vinegar, fill a spray bottle with undiluted distilled white vinegar and spray it directly onto the mold. Let the vinegar sit for at least one hour to absorb into the mold. Scrub if necessary, then rinse with water and dry thoroughly.
Hire A Mold Remediation Team For Bathroom Mold Removal
Maintaining a mold-free bathroom ceiling is essential for your home’s health and aesthetics. However, tackling extensive mold issues can be daunting and may require professional intervention. At our mold cleaning company, we specialize in thorough and effective mold remediation services, ensuring your bathroom is safe and mold-free. Contact us today to get an estimate of mold remediation service and let our experts handle the mold, so you can enjoy a clean and healthy home environment. Don’t wait—act now to protect your home and health!