Mold Remediation Process: 12 Steps And Techniques For Effective Removal
Mold can be a real headache for homeowners. It’s not just unsightly – those fuzzy patches on your walls or in damp corners can actually impact your health, triggering allergies and breathing issues. If you’ve spotted mold in your home, you’re probably wondering what to do next.
While some might tell you mold removal is a simple DIY job, it’s often more complex than it seems. Proper mold abatement involves more than just scrubbing away visible growth. It requires identifying the source of moisture, addressing any underlying issues, and ensuring the mold is mitigated and doesn’t return.
This guide will walk you through the steps of the mold remediation process, helping you understand what to expect when dealing with a mold problem in your home.
What Is Mold And Why Does It Grow Indoors?
Molds are naturally occurring species of fungus. They grow best in warm, damp conditions—conditions common in flooded homes—and reproduce by means of tiny spores that can float through the air. Molds are typically green or black in color. Unlike mildew, which is a surface fungus that is typically gray or white and can be easily cleaned away, mold has tiny branches and roots, allowing it to grow both on top of and into materials like wood.
Mold may begin growing indoors when mold spores land on surfaces that are wet. Moisture is the essential factor for mold growth, and without it, mold cannot grow. Common sources of excess moisture that lead to mold growth include:
- Water intrusion from storm and flooding events.
- Roof leaks and resulting moisture in walls, ceilings, and attics.
- Wet subfloor, carpet, and/or flooring.
- Water sitting in a basement or crawl space creating high humidity in the home.
- Plumbing backups.
- Mold spores in HVAC ducts.
- Inadequate attic ventilation
What Types Of Mold Are Commonly Found Indoors?
One of the most well-known indoor molds is Stachybotrys chartarum, also known as Stachybotrys atra. This greenish-black mold thrives on materials like drywall, sheetrock, ceiling tiles, and wood when they become moist or water-damaged.
Stachybotrys is particularly notable because some strains can produce mycotoxins. However, not all greenish-black molds are Stachybotrys, and the production of mycotoxins depends on factors such as the material the mold is growing on and environmental conditions like temperature, pH, and humidity. Importantly, both living and dead spores of this mold can present health risks.
Beyond Stachybotrys, various molds manifest in multiple colors, including white, gray, brown, black, yellow, or green. These molds can appear as stains or fuzzy growths on building materials and furniture, especially in areas with high humidity or moisture levels. Common indoor environments that support mold growth include basements, showers, and areas with water leaks or condensation.
What Is Mold Remediation?
Mold remediation involves cleaning up mold and preventing its regrowth. Our mold remediation process consists of several steps. First, we fix water problems and dry out the area as soon as possible. The work area should be thoroughly dry (below 20% moisture) before beginning remediation. Personal protective equipment is essential, including protective coveralls, nonvented safety goggles, respirator masks with P100 filters, and two types of gloves.
We isolate the work area, clearing nails and staples, and treat framing by scrubbing with wire brushes, applying EPA-registered fungicide, and wiping down surfaces. We use fungicide instead of bleach, as bleach is not effective for mold remediation on porous materials like wood.
After treatment, we vacuum all exposed surfaces three times with a HEPA vacuum. The area is then dried completely, allowing at least 48 hours to reach below 17% moisture. Our remediation process is considered finished when the water problem is fixed, no visible mold or moldy odors are present, there are no signs of recurring water damage or mold growth, and the framing is completely dry.
A full-service mold remediation company in Memphis like us will help you through the entire process of mold removal and cleaning in your Memphis homes.
How To Prevent Mold Growth In Home?
To prevent mold growth in your home, you need to follow these guidelines:
- Control Moisture Indoors: Indoor mold growth can be prevented or controlled by controlling moisture levels indoors.
- Fix Plumbing Leaks: Repair plumbing leaks and other water problems as soon as possible.
- Dry All Items Completely: Ensure that all items are completely dried after getting wet.
- Improve Ventilation: Properly ventilate areas prone to moisture, such as bathrooms and kitchens.
- Use Dehumidifiers: Utilize dehumidifiers to reduce humidity levels in your home, especially in basements and crawl spaces.
- Insulate Attics: Ensure adequate attic ventilation to prevent moisture buildup.
- Clean and Repair Roof Leaks: Address roof leaks promptly to prevent moisture from entering walls, ceilings, and attics.
- Avoid Standing Water: Prevent water from sitting in basements or crawl spaces, as it can create high humidity in the home.
What Are The Essential Steps In The Mold Remediation Process?
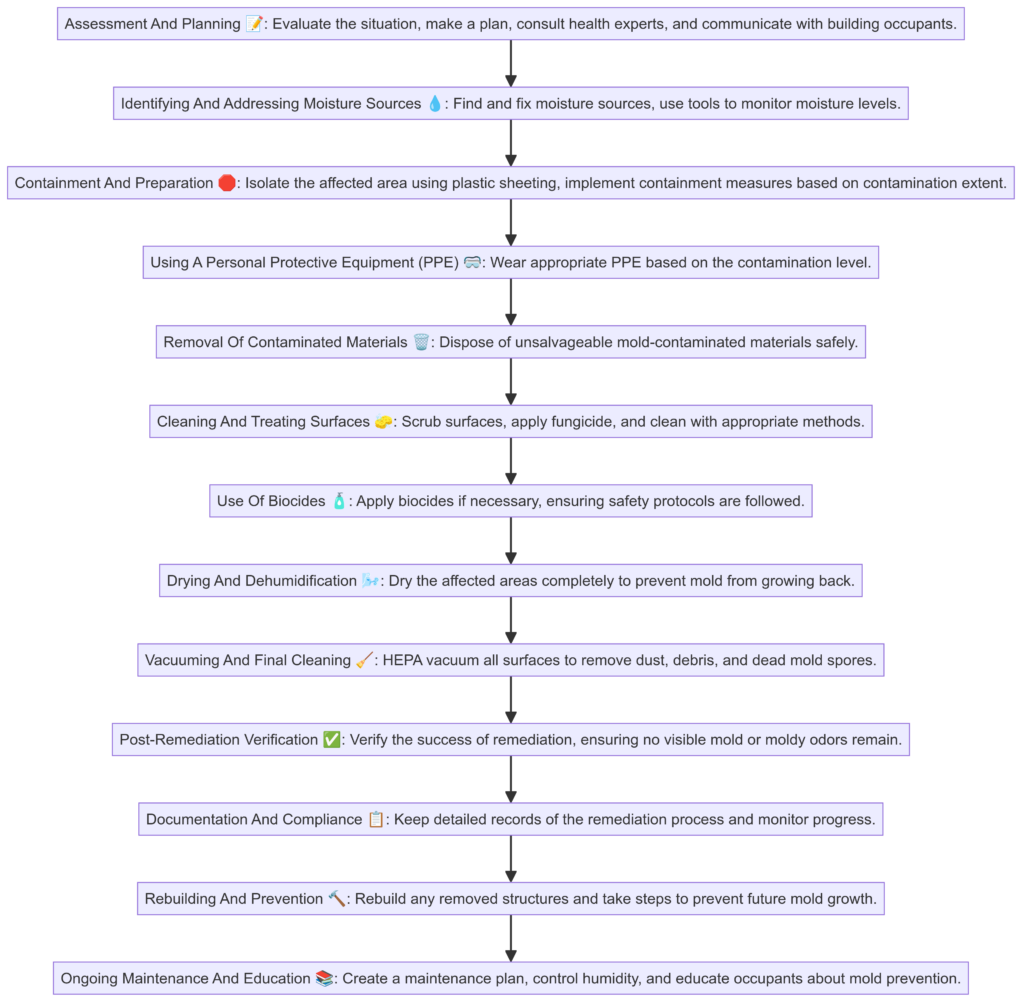
The process for mold remediation involves several detailed steps to ensure effective removal and prevention of future mold growth. Here is the step-by-step process for mold remediation:
1. Assessment And Planning
The mold remediation process starts with a careful look at the situation and making a plan. This means talking to health experts to address any worries that come up and finding a good mold removal specialist. It’s important to figure out how big the mold problem is and what kinds of materials have been affected. A full plan for getting rid of the mold should be made, adjusting standard guidelines to fit the specific case. It’s also key to keep the people in the building informed about what’s going on.
You don’t usually need to test for mold if you can see it or smell a musty odor. But sometimes mold testing is needed, like if there’s a lawsuit, if it’s not clear where the mold is coming from, or if someone has gotten sick from mold and their doctor wants to confirm what caused it. f sampling is necessary, it should only be done after developing a sampling strategy.
2. Identifying And Addressing Moisture Sources
Finding and fixing moisture sources is the first step before starting mold remediation. This means checking the outside of your house for cracks where water can get in. A mold remediation company fixes any leaks, improve drainage, and control indoor humidity. Mold removal companies make sure water doesn’t pool around your home, keep gutters clean, and replace missing roof shingles quickly. Energy-efficient windows can also help keep moisture out.
The water or moisture problem may need to be completely solved to stop mold from coming back. Experts use tools like moisture meters, infrared cameras, borescopes, and humidity detectors to check and track moisture levels. Look for hidden water sources or high humidity. Also, think about any delayed maintenance or recent changes in how the building is used that might lead to moisture problems.
3. Containment And Preparation
Once the moisture source is addressed, the affected area must be contained to prevent mold spread. A 6mm plastic sheeting is used to isolate the area, attaching it with duct tape or staples. Containment measures are implemented based on the extent of contamination:
| Area Size | Containment Level | Measures |
|---|---|---|
| Small (< 10 sq ft) | Minimal | None required |
| Medium (10-100 sq ft) | Limited | Use polyethylene sheeting, maintain negative pressure with HEPA filtered fan, block supply and return air vents |
| Large (> 100 sq ft) | Full | Use two layers of fire-retardant polyethylene sheeting, maintain negative pressure with HEPA filtered fan exhausted outside, block supply and return air vents |
4. Using A Personal Protective Equipment (PPE)
Proper PPE is crucial for worker safety during mold remediation. The level of PPE required depends on the extent of contamination:
| Contamination Level | Required PPE |
|---|---|
| Minimum (Small areas) | Gloves, N-95 respirator, goggles |
| Limited (Medium areas) | Gloves, N-95 or half-face respirator with HEPA filter, disposable overalls, goggles |
| Full (Large areas) | Gloves, full-body disposable clothing, headgear, foot coverings, full-face respirator with HEPA filter |
Respirators should be cleaned with antibacterial wipes and dried before use. They must be worn at all times in the work area until at least 24 hours following wire brushing and vacuuming.
4. Removal Of Contaminated Materials
The mold cleanup process also involves getting rid of mold-contaminated materials that can’t be salvaged. This often includes things like ceiling tiles, drywall, and carpets. tHE nails and staples should be taken out from all the wooden parts of the structure, like top plates, base plates, studs, and joists.
Moldy items should be placed in sealed, double-layered 6mm trash bags. The tops of the bags should be twisted, folded over, and taped shut to prevent mold spores from escaping.
5. Cleaning And Treating Surfaces
All exposed surfaces of the framing should be scrubbed with a wire brush. Brushing should be done up and down, side to side, circularly, and diagonally to ensure thorough cleaning. This process activates any latent mold in the wood and increases the surface area of the framing, allowing deeper penetration of fungicide.
The following table outlines strategies for cleaning materials affected by mold due to water damage, focusing on actions to be taken within 24-48 hours:
| Water-Damaged Material | Actions |
|---|---|
| Books and papers | Discard non-valuable items, photocopy valuable ones, freeze or freeze-dry if necessary. |
| Carpet and backing | Remove water with vacuum, reduce humidity, accelerate drying with fans. |
| Ceiling tiles | Discard and replace. |
| Cellulose insulation | Discard and replace. |
| Concrete or cinder block | Remove water with vacuum, use dehumidifiers, fans, and heaters to dry. |
| Fiberglass insulation | Discard and replace. |
| Hard surface, porous flooring | Vacuum or damp wipe with water and detergent, ensure underflooring is dry. |
| Non-porous hard surfaces | Vacuum or damp wipe with water and detergent, scrub as needed. |
| Upholstered furniture | Use water extraction vacuum, dehumidifiers, fans, and heaters; consult professionals if valuable. |
| Wallboard (Drywall/Gypsum) | Dry in place if no swelling, otherwise discard and replace. Ventilate wall cavity if possible. |
| Window drapes | Follow manufacturer’s cleaning instructions. |
| Wood surfaces | Remove moisture, use dehumidifiers, gentle heat, and fans. Clean treated wood with mild detergent. |
After scrubbing, an EPA-registered fungicide should be applied to all wood surfaces according to the product instructions. Spray application is often the easiest method. Sprayed areas should be wiped down with a shop towel, using a clean face each time and discarding the towel once all faces have been used. Dirty towels should not be reused or re-dipped into the fungicide solution.
If mold growth has occured or materials have been wet for more than 48 hours, you should follow cleaning methods presented in these three tables:
| Material | Cleanup Methods | PPE | Containment |
|---|---|---|---|
| Books and papers | High-efficiency particulate air (HEPA) vacuum after the material has been thoroughly dried. | N-95 respirator, gloves, goggles | None required |
| Carpet and backing | Wet vacuum, HEPA vacuum after drying | ||
| Concrete or cinder block | Wet vacuum, HEPA vacuum after drying | ||
| Hard surface, porous flooring | Wet vacuum, damp-wipe with water and detergent, HEPA vacuum after drying | ||
| Non-porous hard surfaces | Wet vacuum, damp-wipe with water and detergent, HEPA vacuum after drying | ||
| Upholstered furniture | Wet vacuum, HEPA vacuum after drying | ||
| Wallboard | HEPA vacuum after drying | ||
| Wood surfaces | Wet vacuum, damp-wipe with water and detergent, HEPA vacuum after drying |
| Material | Cleanup Methods | PPE | Containment |
|---|---|---|---|
| Books and papers | High-efficiency particulate air (HEPA) vacuum after the material has been thoroughly dried. | Gloves, N-95 respirator or half-face respirator with HEPA filter, disposable overalls, goggles/eye protection | Use polyethylene sheeting ceiling to floor around affected area with a slit entry and covering flap; maintain area under negative pressure with HEPA filtered fan unit. Block supply and return air vents within containment area. |
| Carpet and backing | Wet vacuum, HEPA vacuum after drying, discard – remove water damaged materials and seal in plastic bags while inside of containment, dispose of as normal waste, HEPA vacuum area after it is dried | ||
| Concrete or cinder block | Wet vacuum, HEPA vacuum after drying | ||
| Hard surface, porous flooring | Wet vacuum, damp-wipe with water and detergent, HEPA vacuum after drying | ||
| Non-porous hard surfaces | Wet vacuum, damp-wipe with water and detergent, HEPA vacuum after drying | ||
| Upholstered furniture | Wet vacuum, HEPA vacuum after drying, discard – remove water damaged materials and seal in plastic bags while inside of containment, dispose of as normal waste, HEPA vacuum area after it is dried | ||
| Wallboard | HEPA vacuum after drying, discard – remove water damaged materials and seal in plastic bags while inside of containment, dispose of as normal waste, HEPA vacuum area after it is dried | ||
| Wood surfaces | Wet vacuum, damp-wipe with water and detergent, HEPA vacuum after drying |
| Material | Cleanup Methods | PPE | Containment |
|---|---|---|---|
| Books and papers | HEPA vacuum after drying | Gloves, disposable full body clothing, headgear, foot coverings, full-face respirator with HEPA filter | Use two layers of fire-retardant polyethylene sheeting with one airlock chamber. Maintain area under negative pressure with HEPA filtered fan exhausted outside of building. Block supply and return air vents within containment area. |
| Carpet and backing | Wet vacuum, HEPA vacuum after drying, discard if heavily contaminated | ||
| Concrete or cinder block | Wet vacuum, HEPA vacuum after drying | ||
| Hard surface, porous flooring | Wet vacuum, damp-wipe with water and detergent, HEPA vacuum after drying, discard if heavily contaminated | ||
| Non-porous hard surfaces | Wet vacuum, damp-wipe with water and detergent, HEPA vacuum after drying | ||
| Upholstered furniture | Wet vacuum, damp-wipe with water and detergent, discard if heavily contaminated | ||
| Wallboard | HEPA vacuum after drying, discard if heavily contaminated | ||
| Wood surfaces | Wet vacuum, damp-wipe with water and detergent, HEPA vacuum after drying, discard if heavily contaminated |
6. Use Of Biocides
The use of biocides is not routinely recommended during mold remediation. However, there may be instances when biocide use is justified, such as when immune-compromised individuals are present. Biocides are toxic to both humans and molds. If biocides are used, occupants must be evacuated, adequate ventilation must be provided, and appropriate PPE must be worn. Some biocides are registered pesticides with the EPA and may only be applied by licensed applicators. The mold remediation team should carefully assess the situation and decide on the necessity of biocides, considering all safety protocols.
In addition, encapsulation might be used as part of the remediation process. Encapsulation involves applying a sealant to the affected areas after cleaning and treatment to prevent mold from returning. This step is particularly useful in areas where complete removal of mold-affected materials is impractical. However, encapsulation should only be performed once the mold has been thoroughly removed and the area has been adequately dried to prevent future growth.
7. Drying And Dehumidification
Drying out the affected areas completely is essential to prevent mold from growing again. The mold removal team recommends allowing materials at least 48 hours to dry fully, with a target moisture content of under 17%. This can be achieved by opening windows and using fans, air blowers, and dehumidifiers. Raising the temperature to 90 degrees can significantly speed up the drying process.
Before turning on your heating or air conditioning system, have it checked by the mold removal team to ensure it is mold-free. Tools such as wet vacuums, dehumidifiers, air movers, axial blowers, and air injection systems are effective in removing water and aiding the drying process.
Maintain a daily log of the drying process. Record the temperature and humidity levels inside and outside, the moisture content of the affected building materials, and the performance of your heating and cooling system. This log will help the mold removal team monitor progress and make necessary adjustments to ensure thorough drying.
8. Vacuuming And Final Cleaning
Once all framing has been treated, your mold remediation company will vacuum all exposed surfaces three times with a HEPA (High-Efficiency Particulate Arresting) vacuum to remove dust, debris, and dead mold spores. After removing mold-contaminated materials, mold remediation company will perform a thorough final cleaning using damp wiping and HEPA vacuuming. The team ensures that no visible mold, dust, or debris remains, guaranteeing a clean and safe environment.
9. Post-Remediation Verification
After remediation, your mold remediation company will verify that the process has been successful. The team ensures there is no visible mold or moldy odors, although some staining and cosmetic damage may remain. They will check the site for any signs of recurring water damage or mold growth shortly after cleanup.
The mold remediation company uses a moisture meter to confirm that the framing is completely dry, aiming for a moisture level below 17%. A qualified professional from the team will conduct an inspection at this stage to certify that remediation has been successfully completed.
To confirm mold removal, the company will perform clearance procedures, including visual inspections, moisture measurements, and air sampling. They ensure that the area is safe for occupancy, and that people can re-enter without experiencing health complaints or physical symptoms.
10. Documentation And Compliance
Throughout the cleanup process, a mold remediation team will keep detailed records of every step taken to resolve the issue. This includes maintaining a daily log of indoor and outdoor temperature and humidity levels, documenting the moisture content of the affected building materials, and monitoring the performance of your heating and cooling system.
11. Rebuilding And Prevention
After the area is certified as clean by your mold remediation company, you can begin rebuilding any removed structures. During the rebuilding process, take steps to prevent future mold growth. The mold remediation team recommends keeping surfaces clean and dry, regularly checking and maintaining your building and HVAC systems, and controlling humidity and condensation.
12. Ongoing Maintenance And Education
To avoid mold problems in the future, create an ongoing maintenance plan. Keep surfaces dry, improve air flow by using fans or opening windows to lower indoor humidity, and insulate cold surfaces to reduce condensation. Teach people in the building about activities that create moisture. Encourage habits that lower mold risk, like using exhaust fans when cooking and bathing, and not drying clothes indoors.
How Do Air Movers And Axial Blowers Assist In Mold Remediation?
Air movers are designed to push air along floors and walls. They’re used to speed up drying by directing air at wet materials. This increased air movement helps moisture evaporate from surfaces faster, cutting down the time materials stay wet.
On the other hand, axial blowers force a lot of air across a wide area. They’re useful for drying larger spaces by moving significant amounts of air, which promotes quicker moisture evaporation and helps prevent mold from growing.
Before using any blowers, make sure water is clean. Using blowers on contaminated water can spread mold spores and other harmful particles. Also, fans and blowers shouldn’t be used in healthcare environments due to potential shock hazards and the risk of spreading contaminants.
The use of blowers and air movers should be combined with dehumidification to effectively remove moisture from the air and the affected materials. This combination enhances the overall drying process and helps to prevent secondary damage caused by high humidity levels.
How Should Mold In HVAC Systems Be Handled To Prevent Spread?
Dealing with mold in HVAC systems requires a methodical approach to stop its spread and keep indoor air healthy. The first step is a thorough assessment to find mold in the HVAC system. This means checking ducts, motors, compressors, and other parts for visible mold. Borescopes can help inspect hard-to-see areas behind walls and inside ducts. Knowing where mold is and how much there is helps plan effective cleanup.
After finding mold, it’s important to manage air handling units (AHUs) in affected areas correctly. Don’t turn off AHUs unless there’s a lot of visible mold in the ducts and containment isn’t possible. Keeping AHUs running helps dry things out and control humidity, which stops more mold from growing. But if there’s a lot of mold, containment measures are needed to keep mold spores from spreading to clean areas.
For containment, stop water damage restoration until the moldy area is properly sealed off. Use engineering controls and careful work practices to prevent mold spores from spreading. Once contained, remove and clean contaminated HVAC parts. This includes properly disposing of moldy materials like filters and insulation in the system to avoid recontamination. Follow standard cleanup guidelines for thorough and effective cleaning.
How Should Water-damaged Books And Papers Be Treated?
One effective method for treating valuable books and papers is freezing. The items can be placed in a frost-free freezer or a meat locker. Freezing is particularly useful as it halts the progression of water damage and mold growth, buying time until more thorough drying and restoration techniques can be applied. Once frozen, the items can be subjected to freeze-drying processes, which gradually remove moisture through sublimation, thereby preserving the integrity of the paper and ink.
What Is The Procedure For Dealing With Wet Carpet And Backing?
Handling wet carpet and backing involves several key steps to ensure thorough drying and stop mold from growing. First, use a water extraction vacuum to pull out as much water as possible from the carpet and backing. This is crucial for quickly reducing moisture. Next, use a dehumidifier to lower the humidity in the air, which helps dry the area more. To speed up drying, use blowers to push air along the carpet and backing surfaces. This helps any leftover moisture evaporate faster.
Once the carpet isn’t soaked anymore, steam clean it. This not only cleans the carpet but also uses heat to kill any potential mold spores. It’s also important to make sure the subfloor under the carpet is dry and clean. Any moisture left in the subfloor can lead to mold growth.
How Should Contaminated Ceiling Tiles And Insulation Be Managed?
When dealing with contaminated ceiling tiles and insulation, it’s important to remove and replace them quickly to stop mold growth and keep things safe. Start by carefully taking out the affected ceiling tiles and insulation. Use proper protective equipment when handling these to avoid contact with mold spores or other contaminants. Put these materials in sealed containers or bags to prevent mold spores from spreading during disposal. Make sure to get rid of the contaminated materials following local rules for hazardous waste.
After removal, check nearby areas for any signs of moisture or more contamination. Clean and dry these areas thoroughly to prevent future mold growth. If needed, use dehumidifiers and air movers to make sure the affected space is completely dry before putting in new ceiling tiles and insulation.
When Can I Start Rebuilding After Mold Remediation Is Finished?
You can start rebuilding after mold remediation is finished once the wooden framing in your home has completely dried out. The wooden framing must test below 17% moisture before you can begin installing drywall, flooring, or other finish materials.
Most molds can grow at moisture levels of 20% or higher in wooden framing, so it is crucial to ensure that the moisture content is adequately reduced. The drying process can be expedited by using a combination of dehumidifiers, air blowers, and heating equipment. Turning the heat up to 90 degrees can significantly impact the time it takes to dry out the framing.
Can You Paint Over Moldy Surfaces?
No, you should not paint over moldy surfaces. It s important to clean up the mold and dry the surfaces completely before painting. Painting over moldy surfaces will likely result in the paint peeling because the underlying mold problem has not been addressed. Mold can continue to grow underneath the paint, causing further damage and potential health issues.
What Are The Best Practices For Using Fungicides In Mold Remediation?
The best practices for using fungicides in mold remediation include using an EPA-registered fungicide specifically intended for killing mold and other fungi, both on and below the surface of contaminated materials. It is crucial to use fungicides because they penetrate porous materials like wood, effectively killing mold roots and preventing regrowth. During the application, ensure all wood surfaces are scrubbed with wire brushes to open up the wood fibers for better fungicide penetration.
Follow the product instructions carefully, and when recommended, spray application is often easiest. Wipe down sprayed areas with clean shop towels, flipping the towel to a different clean face each time it becomes dirty, and discard once all faces have been used. Avoid reusing dirty towels or dipping them back into the fungicide. Mark the treated areas to track progress and ensure thorough application.