Mold On Silicone Shower Caulking: Causes, Removal And Prevention Tips
TL;DR: To effectively remove mold from silicone shower caulking, begin by applying a powerful cleaning agent such as gel bleach or a paste made from bleach and baking soda directly to the affected areas. Let this solution sit for approximately 4 hours to penetrate and kill the mold. For particularly stubborn mold infestations, specialized commercial products like CLR Mold and Mildew Remover or Concrobium can be more effective. If these cleaning methods prove unsuccessful, the next step involves removing the old caulk entirely using a caulk softener and a sharp razor blade. Once removed, thoroughly clean the exposed surface with rubbing alcohol and acetone before applying new 100% silicone caulk specifically designed for bathroom use, such as GE Advanced Silicone 2 Caulk. Allow the new caulk to cure for 24-36 hours. To prevent mold regrowth, implement a daily maintenance routine: use an exhaust fan for 30 minutes after showering, maintain bathroom humidity below 50% using a dehumidifier if necessary, and wipe down surfaces with a squeegee or dry cloth.
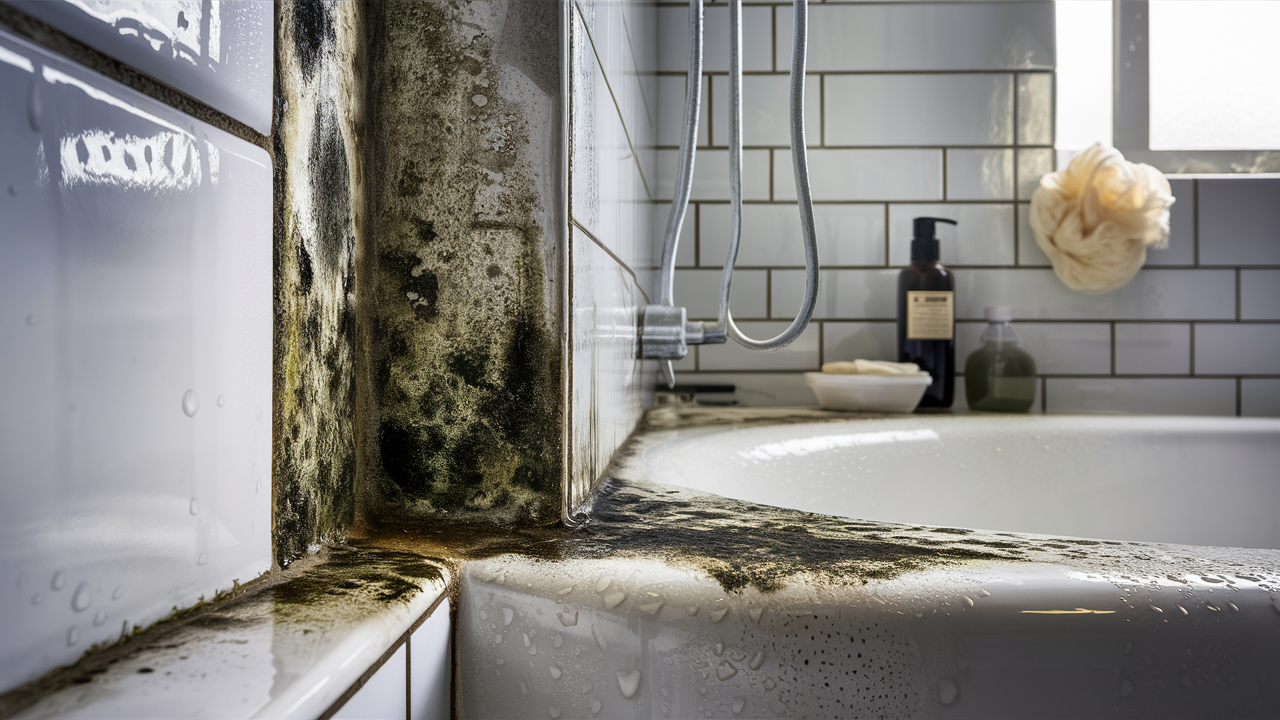
Mold growth on silicone caulking is a common issue in bathrooms. It’s unsightly and can pose health risks. Despite regular cleaning, mold often persists. However, removing mold from shower caulking is manageable with the right approach. This guide covers effective methods for eliminating mold and restoring your shower’s appearance. We’ll explore techniques suitable for both minor and extensive mold problems.
There are several ways to remove mold from shower caulking. These range from household solutions to commercial products. The method you choose depends on the extent of the mold growth. We’ll discuss each approach in detail, including the materials needed and steps to follow.
Is Mold In Shower Caulk Dangerous?
Mold in shower caulk is a common issue that keeps coming back even with regular cleaning. It needs quick attention to prevent damage and possible health concerns. Usually, it’s mildew rather than toxic black mold growing under the caulk where moisture stays. While mold in shower caulk is not clearly labeled as dangerous, its stubborn nature and potential risks mean it needs to be dealt with.
You can clean with vinegar, bleach mixtures, or special mold removers to control growth. For a long-term fix, removing old caulk and replacing it with high-quality, mold-resistant silicone caulk works best. This involves thorough cleaning, complete drying, and careful application of new bathroom caulk.
Good air flow helps prevent mold. Use a small dehumidifier, leave the bathroom door open after showers, and keep air moving. Be careful with strong chemicals like bleach in small bathroom spaces.
Mold in shower caulk resists various cleaning methods, making it an ongoing maintenance challenge. Regular checks, consistent cleaning, and replacing caulk when needed are key to keeping a mold-free shower.
What Causes Mold To Grow On Shower Caulking?
Water intrusion through cracked tiles and grout, inadequate waterproofing from acrylic liners, and deteriorating caulk cause mold growth on shower caulking. The warm, humid bathroom environment and organic residues in caulking further promote mold development.
Here are the following causes that lead to mold growth on shower caulking:
Water Intrusion
Water intrusion is the main cause of mold growth on shower caulking. Cracked tiles and grout allow water to seep behind walls, creating damp spots ideal for mold.
Even when old caulk is replaced, underlying issues can persist which leads to continued water infiltration. Liner installers often use caulk that fails over time and makes the problem worse. These waterproofing failures create hidden moist areas where mold thrives, often unnoticed until significant growth occurs.
Inadequate Waterproofing
Acrylic liner installation, while intended to cover existing problems, often leads to inadequate waterproofing. These liners are molded to fit the exact size and shape of the bathing space but are sealed with caulk that deteriorates over time.
The vacuum-forming process used to create these liners stretches the acrylic sheet, leaving it thinner along the tub bottom and near the drain. These thin spots are susceptible to cracks, allowing water to seep through and become trapped behind the liner. For instance, a hairline crack near the drain can lead to extensive water accumulation and subsequent mold growth.
Environmental Conditions
The bathroom environment makes mold growth on shower caulking worse. Water trapped behind liners creates an ideal place for mold to grow.
Bathers might hear and feel water moving under their feet, which is both annoying and promotes mold growth. Covering up deteriorating tubs or showers without fixing the real issues can worsen mold problems. This approach is like playing a risky game of “out of sight, out of mind.”
Shower areas are warm, usually above room temperature, and very humid. These conditions are perfect for mold to grow on caulking.
Organic Materials And Nutrients
Shower caulking collects soap scum, body oils, and other organic residues. These provide food for mold to grow. Many caulking products contain organic compounds that also feed mold. Silicone-based caulks resist water but can still harbor enough organic matter for mold to grow. The mix of these food sources with moisture and warmth creates a perfect environment for various mold types to grow and spread along the caulking lines.
How To Remove Mold From Silicone Shower Caulking?
Removing mold from silicone shower caulking involves a comprehensive process of cleaning, disinfection, and potential replacement. Effective methods include using detergents, bleach solutions, or specialized mold removers, coupled with proper safety measures and cleaning techniques. Implementing preventive strategies such as regular maintenance, improved ventilation, and keeping surfaces dry is crucial for long-term mold prevention in bathroom caulking.
Here are the methods to remove mold from silicone shower caulking:
1. Prepare The Area And Ensure Safety
Effective mold removal begins with thorough preparation and adherence to safety protocols. The materials needed for this process include:
- High-quality silicone caulk
- Bleach or mold remover
- Baking soda and hydrogen peroxide
- Alcohol and acetone
- Cotton rolls or paper towels
- Caulk removal tool
- Putty knife or razor blade
- Painter’s tape
- 3-in-1 caulk tool
- Caulking gun
- Personal Protective Equipment (PPE): gloves, protective eyewear, and N-95 mask
An N-95 mask is particularly crucial when dealing with large moldy areas (more than 10 square feet) or when the cleanup process generates significant dust. Proper ventilation in the bathroom, achieved by opening windows or using exhaust fans, reduces exposure to cleaning fumes and mold spores, creating a safer working environment.
2. Remove Old Caulk
Removing the old, moldy caulk is a critical step in effectively eliminating mold from the shower area. This process involves softening the old caulk to facilitate easier removal, followed by careful scraping. To soften the old caulk, apply a caulk softener or orange goo-gone that allows it to penetrate the caulk for the recommended time. This softening process makes the subsequent removal much more manageable.
Once softened, use a caulk removal tool, utility knife, or razor blade to carefully cut through and peel away the old caulk. Focus on areas around the bathtub, shower, sink, and toilet base, as these are common sites for mold growth.
3. Clean And Disinfect The Area
After removing the old caulk, thorough cleaning and disinfection of the area are important to eliminate any remaining mold spores and prepare the surface for new caulk application. This step involves initial cleaning, deep cleaning, and the option to use alternative cleaning methods for stubborn mold.
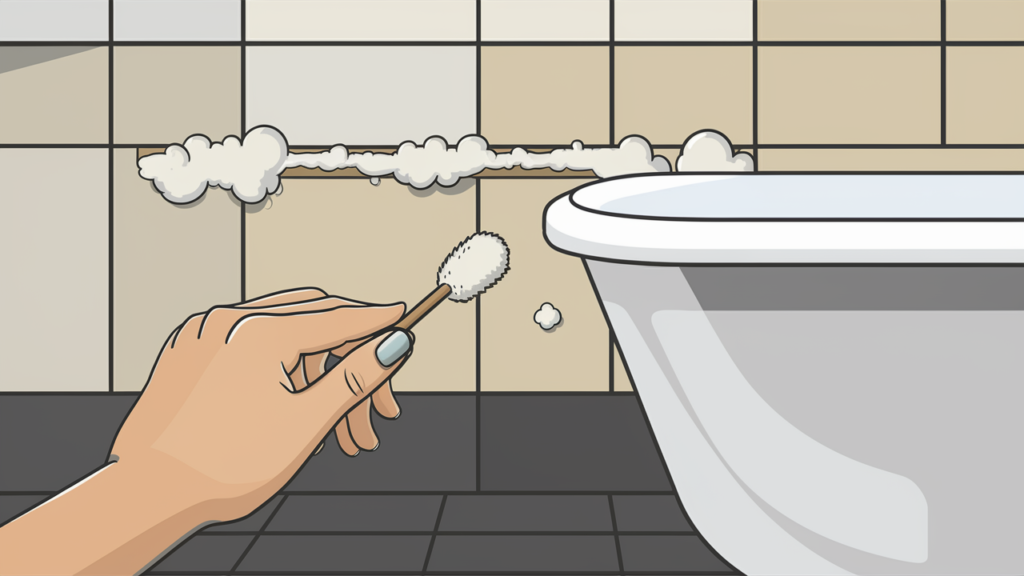
For initial cleaning, prepare a 50/50 mixture of bleach and water and apply it to the affected area using a paper towel. For particularly tough areas, create a paste using bleach and baking soda. Apply the cleaning solution and allow it to sit for a few hours to effectively kill the mold. Following this, perform a deep cleaning using a combination of alcohol and acetone to remove any remaining residue.
Another natural option is using white vinegar. Vinegar’s acidity makes it capable of destroying about 82% of mold species. Apply undiluted white vinegar to the moldy areas, let it sit for an hour, then scrub and rinse. Vinegar’s acidic nature helps kill mold and prevent its regrowth.
For stubborn mold spots, use a toothbrush to scrub the area thoroughly. After cleaning, rinse the area well with clean water to remove all cleaning solution residues.
You can employ following several alternative cleaning methods can be employed for particularly stubborn mold on shower caulking:
- The bleach gel and toilet paper method involves applying gel bleach along the sealant, using twisted-up toilet paper wadded along the sealant, and letting it soak for about 4 hours before rinsing off.
- The cotton rolls and bleach method requires soaking cotton rolls in bleach, placing them on moldy areas for a few hours, then rinsing and scrubbing lightly if necessary.
- The hydrogen peroxide and baking soda method involves mixing these ingredients to form a paste, applying it to the moldy caulk, letting it sit for an hour, then scrubbing lightly with a toothbrush.
- The detergent method uses a detergent solution applied to the affected caulking, scrubbed thoroughly with a brush, and rinsed well with clean water.
Professional mold-killing products like CLR Mold and Mildew Remover or Concrobium can be particularly effective for stubborn mold spots. When using these products, always follow the manufacturer’s instructions for optimal results and safety.
Note: It’s worth noting that although bleach is used as a cleaning solution, its use as a concentrated sanitizer is often discouraged because of potential health and environmental hazards. When possible, opt for milder cleaning agents that are just as effective but pose fewer risks.
4. Dry The Area Thoroughly
You need to thoroughly dry the cleaned area before applying a new caulk. Moisture can prevent proper adhesion of the new caulk and create conditions conducive to mold regrowth.
To expedite the drying process, use a fan or dehumidifier, ensuring proper ventilation in the bathroom to keep humidity levels low. Allow sufficient time for the area to dry completely, typically several hours or overnight.
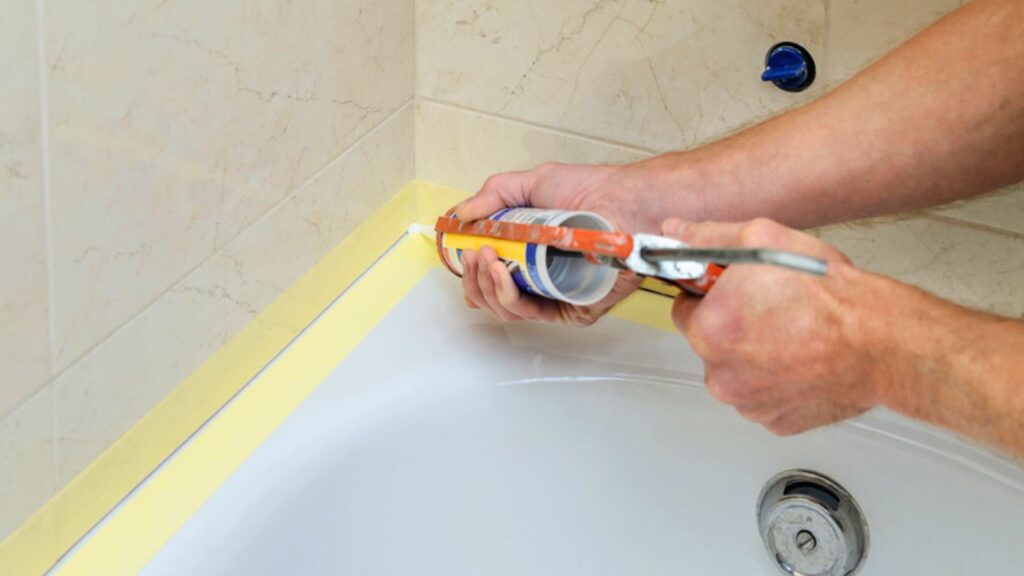
5. Apply New Caulk
Once the area is clean, disinfected, and thoroughly dry, applying new caulk creates a watertight seal and prevents future mold growth. Use 100% silicone caulk that is mold and mildew-resistant and specifically designed for bathroom use.
To prepare for caulk application, apply painter’s tape along the edges where the new caulk will go. This helps ensure clean lines. Cut the tip of the caulk tube at a 45-degree angle to make the application easier and more precise. Using a caulking gun, smoothly apply the silicone caulk along the seam, keeping a consistent bead.
After application, smooth the caulk line using a 3-in-1 caulk tool or your finger dipped in soapy water. This smoothing process presses the caulk into the joint, and ensures proper adhesion and a neat finish.
Promptly remove the painter’s tape before the caulk starts to dry to ensure sharp lines. Allow the caulk to cure for 24 to 36 hours before using the shower. Make sure the bathroom is well-ventilated during this curing process to aid in proper drying and reduce humidity.
How To Prevent Mold Growth On Shower Caulking?
Keeping your caulking clean and stopping mold from coming back takes some work. You need to do a few things regularly. Use a squeegee to wipe down the shower after each use. This gets rid of extra water. Keep the shower area dry and let air flow through it. A daily shower spray can help stop mold from building up. Check your caulk often for any signs of mold or damage. If you see problems, fix them right away.
Good air flow is really important to stop mold. Put in an exhaust fan or use a dehumidifier to keep the air dry. Open windows when you shower and for a bit after. This lets moisture get out and makes it harder for mold to grow. It’s also key to fix leaks fast. Look at your plumbing and caulking often for leaks or cracks. If you find any, repair them right away. This stops water from sticking around and helping mold grow.
Using products that fight mold when you clean can give you extra protection. Think about using mold inhibitors approved by the EPA for your regular cleaning. Use these even if you can’t see any mold. This helps keep mold away from your bathroom before it becomes a problem.
Why Mold On Shower Caulking Keeps Returning After Cleaning?
Mold on shower caulking often keeps returning after cleaning due to persistent moisture, insufficient ventilation, and improper cleaning or caulking techniques. The bathroom’s high-humidity environment creates ideal conditions for mold growth, especially when ventilation is inadequate.
Many homeowners struggle with this issue despite using various cleaning methods and mold-resistant products. The problem may stem from moisture trapped behind the caulk or within the wall, indicating a deeper issue that surface cleaning alone cannot resolve.
Improper application of caulk, such as not allowing it to dry fully before use or using low-quality products, can also contribute to recurring mold. Additionally, generic caulk may not provide adequate protection against mold compared to high-quality silicone caulk with fungicides.
Poor ventilation, like relying on a cracked window instead of a proper exhaust fan, allows moisture to linger and promote mold growth. Regular cleaning practices, such as using a squeegee to dry shower walls after use, can help prevent mold but may not be sufficient if underlying issues are not addressed. In some cases, the mold may be growing from underneath the caulk, requiring complete removal and replacement of the caulking to effectively solve the problem.
Don’t Let Mold Take Over – Call Us Today!
Dealing with mold in your shower caulking can be frustrating and challenging, even with the best cleaning techniques. If mold keeps coming back, it’s time to call in the experts. Our professional mold removal services ensure thorough cleaning, effective mold treatment, and long-term prevention. Don’t let mold jeopardize your health and the beauty of your bathroom. Contact us today at (901) 250-0431 to schedule a free mold inspection and enjoy a mold-free shower with peace of mind.