
Mold In Air Ducts & Vents: Signs And How To Get Rid Of It?
TL;DR: To eliminate mold in air ducts, begin with a professional inspection using remote camera systems to confirm its presence. Certified experts perform thorough mold remediation using specialized techniques such as negative air pressure cleaning, which ensures complete removal of mold spores. They apply EPA-approved fungicides to eradicate spores and prevent regrowth. Address moisture issues, the root cause of mold growth, by maintaining indoor humidity between 30% and 50% using dehumidifiers if necessary. Install UV germicidal lights near the coil or supply plenum, as these devices effectively inhibit mold proliferation. Regularly change HVAC filters every 3 months or 30,000 miles for vehicles, using high-quality filters to trap spores. In bathrooms, a common source of excess moisture, ensure proper ventilation with exhaust fans during showers. For accessible vents, clean with warm soapy water or a vinegar-water solution, which are effective household remedies. In severe cases where cleaning is insufficient, duct replacement might be necessary. Post-remediation, monitor air quality and consider using HEPA air purifiers to capture any remaining airborne spores. Establish a routine of cleaning vents every few months and removing vent covers annually for thorough cleaning, practices that significantly reduce the likelihood of mold recurrence.
Mold growth in air ducts is a common issue in many homes. It often causes a musty odor when the air conditioning system is first activated. This problem is more than just unpleasant; it can pose health risks, particularly for individuals with allergies or respiratory conditions.
Addressing mold in air ducts is manageable with the right approach. There are several methods to tackle this issue, ranging from do-it-yourself solutions to professional services provided by certified mold remediation specialists.
This guide aims to provide comprehensive information on dealing with mold in air ducts. We will cover various aspects of the problem and its solutions, helping you to improve the air quality in your home. We have also a detailed guide on how our mold remediation process works. Make sure to check that out as well.
What Causes Mold To Grow In Air Ducts And Vents?
Mold growth in air ducts and vents is a persistent issue caused by the combination of moisture, dirt, and debris. This problem stems from various sources of water intrusion, including leaks, poor installation, and inadequate servicing.
Condensation, a major contributor, occurs when the surface temperature around cooling coils drops below the dew point of the surrounding air. High humidity also helps mold grow on duct surfaces. When dust and dirt build up in ducts, they give mold the food it needs to thrive in damp conditions.
Water sources facilitating mold growth are diverse and interconnected. Condensation on cooling coils and other surfaces is common, especially with insufficient drainage. Improperly maintained drain pans that retain water become breeding grounds for significant microbial growth.
Fans and their housings contribute to this issue by creating air turbulence, leading to condensation that supports mold proliferation.
While fiberglass duct liners and duct boards are inherently mold-resistant (as confirmed by UL and ASTM standards), the organic material from accumulated dust and dirt within the HVAC system can still support mold growth when water is available.
Indoor moisture sources that contribute to mold problems are numerous and varied. These include flooding, backed-up sewers, leaky roofs, humidifiers, ice dams, damp basements or crawl spaces, persistent plumbing leaks, steam from cooking and bathing, wet clothes on indoor drying lines, and improperly vented clothes dryers.
Condensation from combustion appliances not properly exhausted outdoors also poses a risk. Inadequate filtration and irregular maintenance compound the issue by allowing dust and dirt buildup within the system, creating ideal conditions for mold growth.
Different types of air duct constructions react differently to mold contamination. Bare sheet metal systems or those with exterior fibrous glass insulation can be cleaned and disinfected, while ductwork with internal fibrous glass liner or made entirely of fibrous glass often needs to be removed and discarded if contaminated with mold.
What Are The Common Sources Of Moisture In Air Ducts And AC Vents?
Common sources of moisture in air ducts and AC vents primarily originate from the indoor air within a home. This air, laden with water vapor, condenses when it cools down inside the ducts, particularly during the winter months. This condensation occurs because, in winter, the indoor air typically holds more water vapor compared to the colder outdoor air.
As this moist air comes into contact with the cooler surfaces of the ducts, it condenses, forming liquid water. This phenomenon is consistent regardless of the duct material, whether it is bare sheet metal, fiberglass-lined sheet metal, wrapped metal, duct board, or flexible duct.
When ducts are unused and situated in unconditioned spaces, they cool to the ambient temperature, causing the moisture in the air to condense and accumulate within them. Without heated air flowing through these ducts, their temperature can drop significantly, leading to ongoing condensation and the subsequent build-up of water. This moisture accumulation can result in significant problems, including promoting mold growth when dust or dirt is present.
What Are Signs Of Mold In Air Ducts?
Here are the signs of mold presence in vents and ductwork:
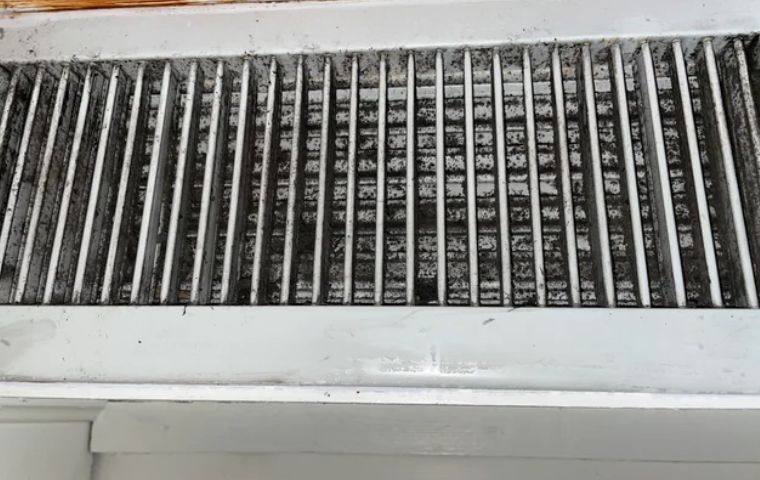
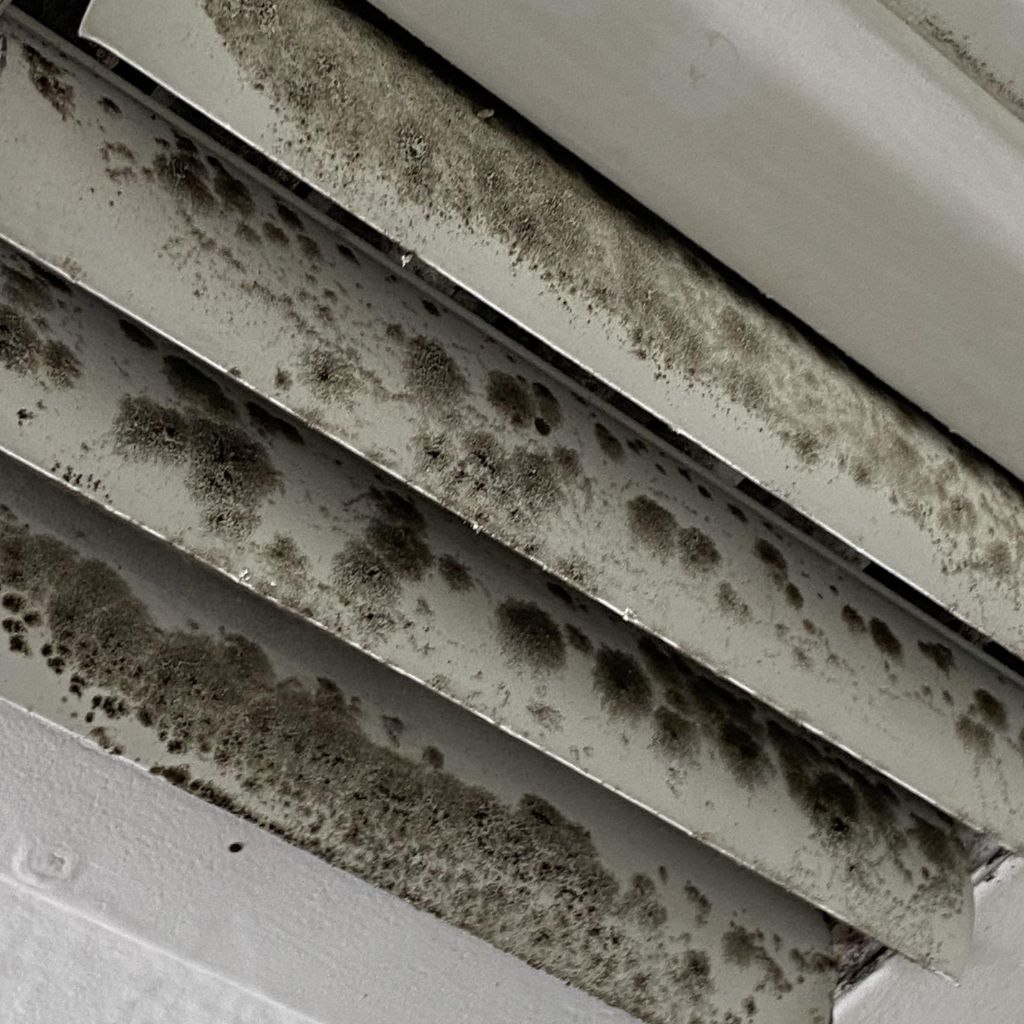
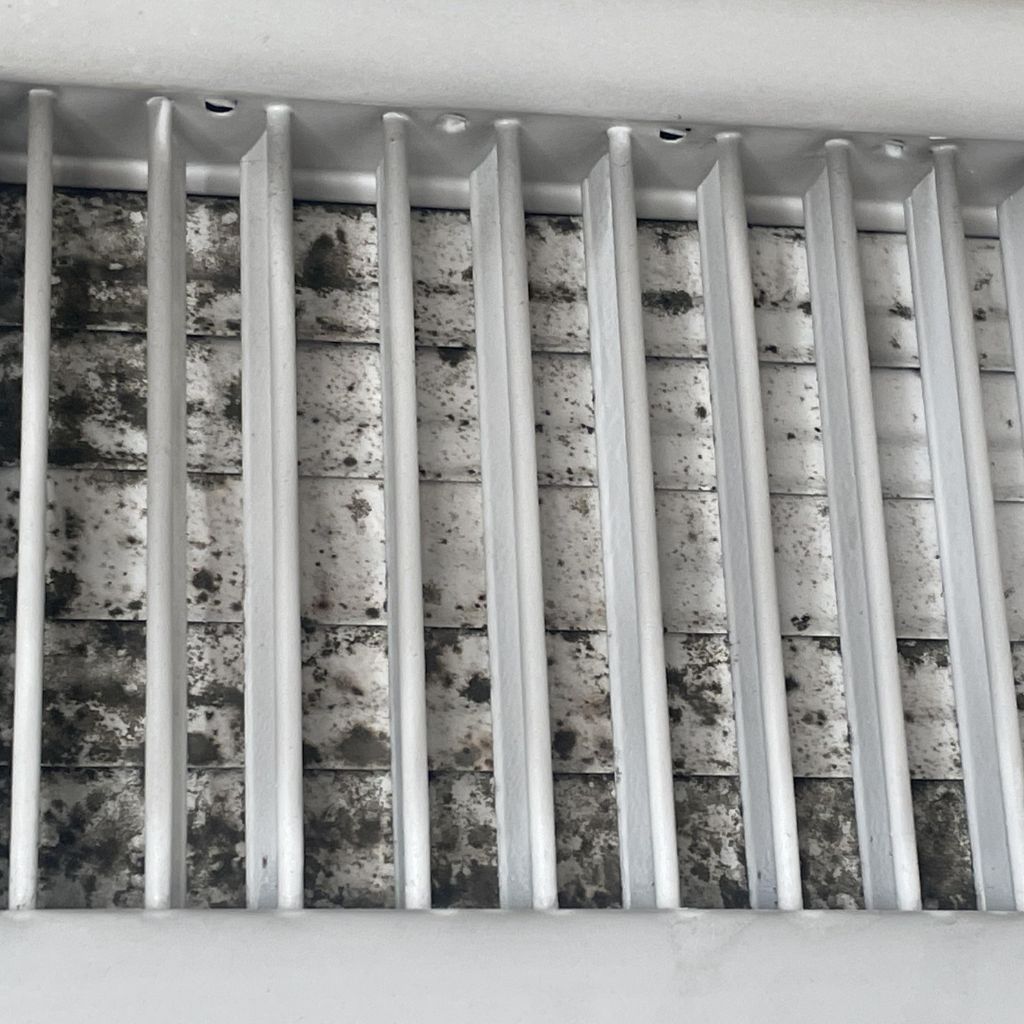
Sign #1: Visual Discoloration
One of the most obvious signs of mold in air ducts is visual discoloration. Look for patches of discoloration on HVAC system components and air ducts. These can appear as spots or larger areas with colors ranging from black to green or brown.
Mold growth is often facilitated by the combination of moisture, dirt, and debris in your air ducts. Various sources of water intrusion, including leaks, poor installation, and inadequate servicing, can create ideal conditions for mold to thrive.
Sign #2: Musty Odors
If you notice musty or moldy odors emanating from your HVAC system, it’s a strong indicator of mold presence. These odors can be present even when mold isn’t immediately visible, suggesting growth in hidden areas of your ductwork.
High humidity levels in your home can contribute to mold growth on duct surfaces. When combined with dust and dirt buildup, these conditions provide mold with the food and moisture it needs to flourish.
Sign #3: Slime Or Sludge In Drain Pans
The accumulation of slime or sludge in drain pans is a significant sign of mold growth. Improperly maintained drain pans that retain water become breeding grounds for significant microbial growth.
Condensation, a major contributor to mold growth, occurs when the surface temperature around cooling coils drops below the dew point of the surrounding air. This moisture, combined with dust and dirt, creates an ideal environment for mold.
Sign #4: Fouled Fans And Housings
Fans and their housings that are fouled with microbial growth and soil accumulation indicate mold issues. These components contribute to the problem by creating air turbulence, leading to condensation that supports mold proliferation.
Sign #5: Visible Particulate Matter
HVAC systems that discharge visible particulate matter into occupied spaces or significantly contribute to airborne particles indoors require cleaning and inspection for mold growth. This can be a sign of extensive contamination within the system.
Sign #6: Restricted Or Blocked Components
Heat exchange coils, cooling coils, and air-handling equipment with restrictions, blockages, or contamination deposits that impair system performance may signal mold presence. These issues can create pockets of moisture and debris where mold thrives.
Sign #7: Poor Filter Condition
Filters in poor condition or those that have exceeded their allowable pressure drop can exacerbate mold growth conditions within the HVAC system.
What Health Risks Are Associated With Mold In Air Ducts?
Mold in air ducts poses several health risks due to the potential for mold spores and mycotoxins to be distributed throughout the living space, affecting indoor air quality.
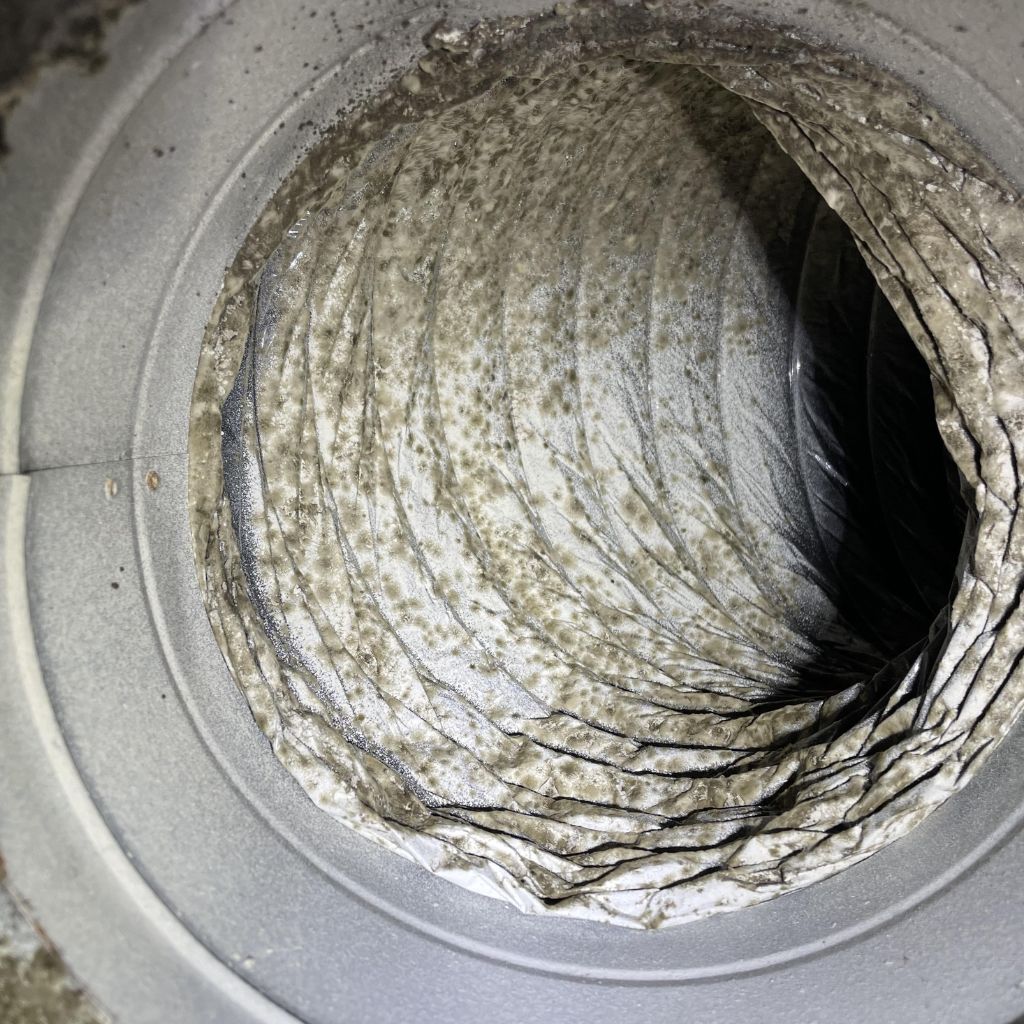
When moisture is present, mold can proliferate on various surfaces within the ventilation system, including metal flex ducts, flat surfaces of metal ducts, plastic-lined flex ducts, caulks, sealants, conditioning coils, metal sound attenuators, mixing box dampers, and internal duct liners. Once mold spores are airborne, they can be inhaled by occupants, leading to respiratory problems.
Common symptoms include sneezing, coughing, and throat irritation, which can exacerbate conditions like asthma and lead to more severe respiratory issues. People with mold allergies might experience heightened reactions such as nasal congestion, eye irritation, or skin rashes.
Furthermore, mold exposure can trigger asthma attacks and cause chronic respiratory problems in sensitive individuals. Infants, children, and the elderly are particularly vulnerable to these health risks. In healthcare settings, where air quality is critical, mold contamination can pose severe risks to patients with weakened immune systems.
How To Get Rid Of Mold In Air Ducts?
Here are the steps to eliminate mold from air ducts:
1. Inspect And Assess The HVAC System
Conduct a thorough inspection of the HVAC system’s cleanliness and mechanical condition, following industry standards set by organizations like ASHRAE and NADCA. Examine key areas such as drain pans for slime and sludge, fans and housings for microbial growth and soil accumulation, and filters for proper condition and pressure drop. Look for visible mold growth on hard surfaces like sheet metal ducts and other components. Pay attention to musty odors emanating from ducts or vents, especially when the system is running.
2. Identify And Address Moisture Sources
Locate and rectify all sources of moisture that contribute to mold growth. This includes fixing leaks, improving ventilation, and ensuring proper drainage around the home. It’s crucial to eliminate moisture sources before beginning remediation, as mold will likely return if the affected area becomes wet again.
3. Prepare For Cleaning
Turn off the HVAC system to prevent spreading mold spores during the cleaning process. Seal off the moldy area to contain spores. Wear protective gear including gloves, a mask or respirator (N95 or TC-21C particulate respirator), protective clothing that can be easily cleaned or discarded, and eye protection.
4. Remove Debris And Contaminants
Use a HEPA filter-equipped vacuum cleaner to remove all loose soil and debris from the ductwork. For porous materials like paper, rags, carpet, wallboard, and rotten wood that may trap mold spores, discard them. Non-porous materials such as glass, plastic, or metal can be kept after thorough cleaning and disinfecting.
5. Choose Cleaning Method
For minor mold issues in air ducts, select an appropriate cleaning solution:
| Method | Ingredients | Application |
|---|---|---|
| Soap and Vinegar Solution | 1 part dish soap, 1 part vinegar, 10 parts water | Use for non-porous surfaces |
| White Vinegar | Undiluted white vinegar | 90% efficacy against mold |
| Baking Soda and Hydrogen Peroxide | Mixture of baking soda and hydrogen peroxide | Apply to affected areas |
For bare sheet metal ducts, use a non-ammonia soap or detergent in hot water to scrub moldy areas. When cleaning heat exchange surfaces, use specialized cleaners like BBJ POWER COIL CLEAN or BBJ MICRO COIL CLEAN, which are formulated to clean without damaging components. For fibrous glass lined or entirely fibrous glass ducts, consider removing and discarding them as they are more challenging to clean effectively.
6. Disinfect The Ducts
After cleaning, disinfect the ducts with a solution of household bleach and water (no more than one cup of bleach per gallon of water). Ensure the working area is well-ventilated to avoid irritation from bleach fumes. For extensive mold issues, consider using EPA-registered biocides to kill bacteria and fungi inside the ducts, following product label instructions carefully.
7. Apply Antimicrobial Treatment
Use an EPA-registered antimicrobial agent like BBJ MOLD CONTROL FOR HVAC SYSTEMS to inhibit future growth. Apply evenly, covering about 60 ft² per container for bare metal and flexible ducts, or 40 ft² for semi-porous surfaces.
8. Replace Contaminated Insulation
If the insulation in the ducts is wet or moldy, remove and replace it as it cannot be effectively cleaned. This step is crucial for preventing future mold growth.
9. Ensure Proper Drainage
Clean and level drain pans to avoid standing water. Remove any accumulated slime and sludge. If necessary, replace deteriorated pans. Clean fan blades and blower wheels to remove soil and microbial growth.
10. Allow For Drying
After treatment, allow cleaned areas to dry naturally overnight to ensure all mold is eliminated. Continue to ventilate the area well and avoid replacing flooring or rebuilding until the area is completely dry.
11. Implement Preventive Measures
Install high-efficiency air filters as recommended by the HVAC system manufacturer and change them regularly. Properly seal and insulate ducts in non-air-conditioned spaces to prevent condensation and moisture intrusion. Consider installing UV germicidal lights in your HVAC system for ongoing mold prevention.
12. Maintain Regular Inspections
Conduct routine inspections of your HVAC system for cleanliness. For systems serving critical spaces like healthcare facilities, perform monthly checks. For standard residential and commercial systems, inspect every 3 to 6 months.
How Often Should Air Ducts Be Inspected For Mold?
HVAC systems should be inspected for cleanliness at varying intervals based on the specific environment and usage conditions. For standard residential and commercial systems, it is recommended to conduct a thorough inspection every three to six months. This frequency helps to identify and address any mold growth, ensuring that the system remains free of microbial contamination.
In critical environments, such as healthcare facilities and clean rooms where air quality is paramount, more frequent inspections may be necessary. Monthly inspections are advised in these settings to minimize the risk of mold and other contaminants that could compromise air quality.
What Are The Costs Involved In Cleaning Mold From Air Ducts?
For extensive mold growth, underlying health conditions, persistent musty odors, or suspected hidden mold, consult professionals. We offer comprehensive mold inspection, advanced cleaning techniques, antimicrobial treatments, and proper disposal of contaminated materials.
Professional remediation costs vary:
- Full remediation with electronic air cleaners and UVC lamps: $4,500
- Air handler cleaning, duct cleaning, and UV light installation: $1,480
- Evaporator coil cleaning, blower removal/cleaning, duct fogging, UV light installation: $1,025
- Basic thorough cleaning: As low as $150
How Can Mold In HVAC Systems Be Prevented?
Here’s how you can prevent mold growth in air ducts and vents:
- Maintain Regularly: Conduct regular maintenance by using high-efficiency air filters recommended by the system manufacturer and replacing them regularly to prevent dirt buildup. Clean cooling coils and drain pans thoroughly during routine HVAC servicing.
- Clean Fans and Housings: Regularly clean fans and their housings to remove soil and microbial growth, as air turbulence can lead to condensation that supports mold development.
- Ensure Clean and Functional Drain Pans: Keep drain pans clean, level, and free of standing water. Replace any deteriorated pans and check all drain lines to ensure they are clear and free-running.
- Optimize System Operation: Run cooling coils at sufficiently low temperatures during summer to adequately dehumidify the air. Ensure proper inclination and continuous drainage of drain pans to avoid stagnant water.
- Inspect for Water Leaks: Implement a regular maintenance schedule to inspect, detect, and address potential sources of water leakage or condensation. Promptly repair any areas where water collection or leakage has occurred.
- Discard Water-Damaged Materials: Remove and discard water-damaged materials like carpets, upholstery, and ceiling tiles to eliminate microbial contamination.
- Seal Unused Ducts: Seal unused air conditioning ducts during the heating season by removing the register or return grill and taping the duct openings closed. For larger openings, tape plastic sheeting over them for a complete seal.
- Insulate Ducts Properly: Ensure ducts are insulated properly to slow down the rate of heat transfer and reduce the likelihood of condensation. Pair insulation with measures to maintain the temperature within the ducts.
- Avoid Continuous Fan Operation in Cold Climates: Do not run fans continuously in colder climates as this can introduce more moist air into the ducts and exacerbate condensation issues. Sealing the ducts remains the most reliable solution.