Mold Under Hardwood Floors: Signs, Health Risks And Removal Tips
TL;DR: To remove mold under hardwood floors, first identify and fix the moisture source. Use a moisture meter to assess dampness. Remove affected floorboards and clean the subfloor with a mixture of 1 cup hydrogen peroxide, 1/4 cup white vinegar, 2 tablespoons dish soap, and consider adding clove oil. For stubborn mold, use Concrobium, RMR-86, oxalic acid, or a bleach-mineral oil combination on porous surfaces. Borax can kill and prevent mold. Dry thoroughly with fans and dehumidifiers, aiming for below 50% humidity. Sand porous surfaces if necessary. Apply Kilz primer before reinstalling boards. For areas over 10 square feet, consult professionals. Consider encapsulating crawl spaces and improving ventilation. When refinishing the hardwood, sand the area, apply oxalic acid to lighten the stains, and use oil-based polyurethane. Mold can be white, powdery, or black. Prevent future mold by maintaining proper ventilation, addressing spills promptly, and using vapor barriers during installation. Regular inspections of high-risk areas near sinks or exterior walls can catch issues early
Discovering mold under hardwood floors is a common concern for homeowners. It can be frustrating to find this issue in your carefully maintained living space. However, mold growth beneath hardwood flooring isn’t an insurmountable problem. This guide will provide information on how to address mold under hardwood floors, covering both minor and more extensive cases.
We’ll begin by explaining how to identify mold growth. Then, we’ll outline the steps to effectively remove it. The goal is to help you understand and resolve this issue, restoring your hardwood floors to their original condition.
What Causes Mold Growth On Hardwood Floors?
Mold on hardwood floors is primarily caused by moisture, which can come from various sources such as water spills, high humidity, and damp, stagnant air. We have also a guide on mold under laminate flooring. Be sure to check that out as well.
Now, let’s discuss causes of mold on hardwood floors in detail:
1. High Moisture Level
Moisture is the main factor causing mold growth on hardwood floors. It’s really the most critical issue. Wood and water don’t mix well at all. Even small amounts of water can damage the finish and warp the wood underneath. This creates an environment where mold loves to grow. Moisture can come from many places, like water spills, high humidity in the air, or areas with damp, stagnant air.
For mold to really start growing on the surface, the wood needs to be quite wet. We’re talking about a moisture content above 19% for about a week. To be more specific, mold growth on lumber surfaces happens when the moisture content by weight is between 20% and 28%.
There are lots of sources of moisture to watch out for. HVAC systems that don’t work properly can lead to high humidity levels. Wet subflooring is another problem. Poor drainage around buildings can result in rainwater runoff or underground water causing issues.
Crawl spaces and basements that aren’t well ventilated or temperature-controlled can also add moisture. Don’t forget about portable water sources like appliances, leaks in the building, or plumbing problems. These can all contribute to excess moisture. Even condensation from temperature differences and air conditioning systems that aren’t maintained properly can create too much moisture.
2. Environmental Conditions
Mold thrives in certain environmental conditions, especially when it comes to temperature. Most types of mold grow best in temperatures between 40°F and 100°F (that’s 4°C to 40°C). The ideal range for mold is between 68°F and 86°F (20°C to 30°C). These temperature ranges are pretty common in our living spaces. This means indoor environments can potentially support mold growth if other factors are present.
Changes in the environment, especially in temperature and humidity, can contribute to mold growth. These changes can cause wood to shrink or swell. This can damage the integrity of the flooring and make it more likely to develop mold.
There’s a scenario called the “Greenhouse Effect” that can happen in buildings. This occurs when HVAC systems aren’t used or are completely turned off for a long time. Sunlight coming through windows generates heat, which can lead to big changes in humidity levels. This creates conditions that mold really likes.
3. Poor Ventilation
Not having enough ventilation is a big contributor to mold growth on hardwood floors. Poor ventilation leads to air that doesn’t move around much. This can trap moisture, creating an ideal environment for mold spores to settle and start growing. This is especially problematic in areas that already have high humidity or where activities generate moisture, like bathrooms, kitchens, and laundry rooms.
Homes that have exposed dirt in crawl spaces and basements tend to have more mold spores floating in the air compared to homes without these features. When these areas don’t have good ventilation, moisture can build up and create conditions that are perfect for mold growth. Good ventilation helps to move air around, lower humidity levels, and prevent the buildup of moisture that mold needs to thrive.
4. Improper Maintenance Practices
Certain ways of maintaining hardwood floors can actually make the problem of mold growth worse. Wet-mopping that leaves standing water on the floor, using steam mops or cleaning devices, and putting down rugs that don’t let moisture escape can all create an environment that’s favorable for mold growth.
Additionally, using household dust treatments incorrectly can cause problems. They might make the floor slippery, dull its finish, or interfere with re-coating. This can potentially create conditions that support mold growth.
Regular vacuuming with a brush attachment, rather than a beater bar, and using dust mops that haven’t been treated help remove dust and dirt that can trap moisture. However, if these practices aren’t followed, they can contribute to mold growth.
5. Installation Issues
Problems with how hardwood floors are installed can make the issue of mold growth worse. Issues like not leaving enough space around the edges or at vertical obstructions, using the wrong fasteners, and not applying enough adhesive in floors that are glued down can create spaces where moisture accumulates. This can lead to mold developing.
Gaps that occur seasonally or are considered normal, compression set, and panelization can also create spaces where moisture accumulates. These installation issues can compromise the integrity of the flooring system. This makes it more susceptible to moisture getting in and subsequent mold growth.
6. Presence Of Organic Material
Mold needs an organic food source to grow, and hardwood floors provide this in abundance. Wood itself serves as a nutrient source for mold. The mold feeds on the sugars and starches present on the surface of the wood. While hardwood floors are generally resistant to fungal growth due to their low nitrogen, sugar, and starch content, they can still support mold if the moisture levels are sufficiently high.
The pulping process used in the production of some wood products removes lignin. This exposes cellulose, which is more accessible to fungi. This can make certain types of processed wood more susceptible to mold growth if they’re exposed to moisture.
How To Test Mold On Hardwood Floors?
Mold on hardwood floors presents as discolored patches (black, green, white) with a musty odor. Key signs include visual discoloration, moisture-related changes, elevated wood moisture content (>20%), and smudging when rubbed. Use moisture meters and tape tests for detection.
Now, let’s discuss signs of mold on hardwood floors in detail:
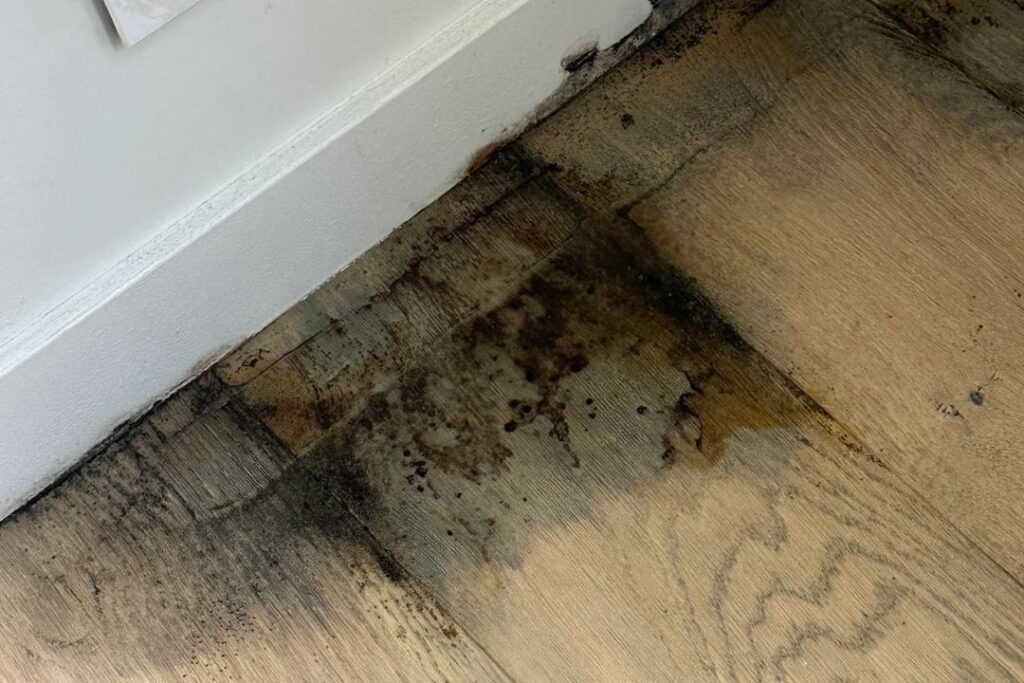
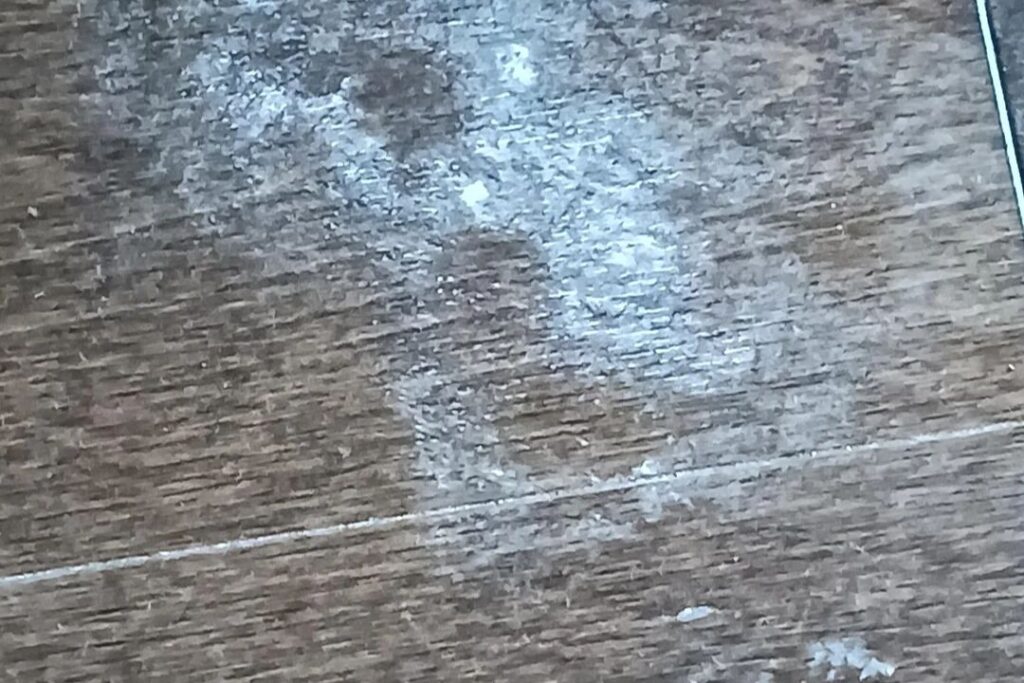
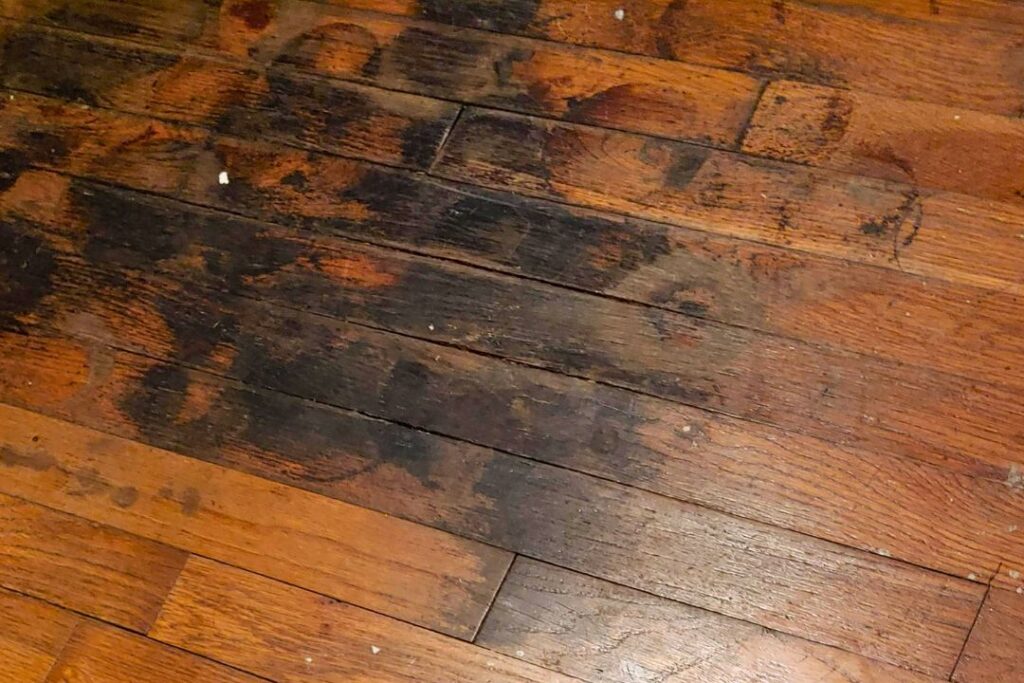
Sign 1: Visual Discoloration
The easiest way to spot mold on hardwood floors is by looking at them. Mold shows up as discolored patches on the wood. These patches can be black, green, white, yellow, pink, brown, or even red. They might look fuzzy, slimy, or like tiny threads. Some mold is easy to brush off, while other types stick firmly to the wood.
Mold spots don’t have a regular shape and can be different sizes. You might see small spots or large patches. Check areas where moisture often collects, like near windows, doors, in kitchens and bathrooms, under rugs or furniture, in corners, along baseboards, and near sinks and appliances. Some molds, like Stachybotrys, Trichoderma, and Aspergillus, are very dark and can leave lasting stains even after you clean them off.
Sign 2: Musty Odor
A strong, musty smell often means mold is present, even if you can’t see it. Mold releases compounds called VOCs as it grows, causing this smell. People often describe it as earthy or damp. You’ll notice it more in areas with poor air flow.
If you smell this odor, there’s likely mold around, even if it’s not visible. The smell is stronger in closed-off spaces or areas without much airflow. It might get worse when it’s humid or after water exposure. If you notice this smell, you should check your hardwood floors and nearby areas carefully. Mold could be growing out of sight, under the surface or in hard-to-see spots.
Sign 3: Moisture-Related Changes
Mold grows well in damp places, so signs of moisture damage might mean mold is growing. Look for water stains, which usually show up as dark marks on the wood. These can happen because of high humidity, wet subflooring, poor drainage, or leaks from pipes and appliances.
Sap stains in the wood’s lighter parts, like blue or brown marks, can also mean fungi are growing in moist conditions. If you see the wood warping, bubbling, or lifting, it might mean moisture has gotten in and mold could be growing. The wood might feel soft, spongy, or even crumbly as mold breaks it down. Mold can also make the floor’s finish look dull, develop small cracks, or warp.
Sign 4: Elevated Moisture Content
Using a tool called a moisture meter can help find areas where mold might grow. Mold is likely to develop in wood that has more than 20% moisture content. By checking regularly with a moisture meter, you can spot high-risk areas before mold starts to grow visibly.
It’s important to know that mold can’t grow on wood that’s dried to less than 20% moisture content. So, keeping the right moisture levels is key to preventing mold growth.
Sign 5: Health Symptoms
While not a direct sign on the floor itself, health issues in people living in the house can point to mold presence. Mold exposure can cause allergic reactions, breathing problems, and other health issues, especially in people who are sensitive to it.
If people in the house have ongoing coughing, sneezing, runny noses, itchy eyes, or worse asthma that gets better when they leave home and worse when they return, it might mean mold is present, including on hardwood floors. These health signs, along with other clues, can help find hidden mold growth that you might not see on the floor’s surface.
Sign 6: Tape Test And Microscopic Examination
A simple way to check for mold is the tape test. Put a piece of clear tape on the area you think has mold, then peel it off and look at it under a microscope or magnifying glass. Mold spores will stick to the tape, making them easier to see.
For a more exact check, looking under a microscope can show mycelia (thread-like structures) and spores. The fuzzy mold you see is made up of these mycelia, which produce tiny spores that can float in the air. This method helps tell mold apart from other kinds of stains or discolorations.
Sign 7: Behavior Of The Stain
To figure out if a discolored spot on hardwood floors is mold, look at how the stain feels and acts. Mold spots are usually fluffy and smudge when you rub them, sending small puffs of spores into the air. This helps tell mold apart from non-living stains like dirt or iron marks, which don’t smudge in this way.
Can Mold Damage The Structural Integrity Of Hardwood Floors?
Mold can indeed damage the structural integrity of hardwood floors, though the relationship between mold growth and structural damage is complex. According to the National Wood Flooring Association, moisture and humidity are primary factors contributing to mold growth on hardwood floors. Mold-related stains, typically grey, black, blue, or orange in color, can indicate deeper structural issues. While surface mold infections on relatively new wood products do not materially change the wood structure or affect its strength and stiffness, the presence of mold is a strong indicator of underlying moisture problems that can lead to more severe issues.
Mold doesn’t eat the wood or make it rot directly. It feeds on nutrients on the wood’s surface and grows when the wood is damp enough – about 19% moisture for a week or so. Surface molds do well when the wood has 20% to 28% moisture by weight. The real trouble is that mold creates conditions for more harmful fungi to grow, especially wood decay fungi.
Wood decay fungi, like Basidiomycetes, are the real threat to hardwood floors. They need even more moisture to grow, usually above 28% by weight. These fungi can break down cellulose and lignin, which give wood its strength. Over time, this can make the wood soft and crumbly.
When wood decay fungi damage floors, the wood becomes spongy or crumbly and loses strength. You might see white, fan-shaped growths or even mushrooms in bad cases. High moisture levels make this worse, helping both mold and decay fungi grow.
Mold on hardwood floors doesn’t just look bad – it’s a warning sign. The moisture that helps mold grow can also make subfloors swell and warp, which weakens the whole floor. In really wet conditions, you might need to replace parts of the subfloor to make it stable again.
How To Remove Mold From Hardwood Floors?
Removing mold from hardwood floors involves identifying and addressing moisture sources, cleaning with appropriate solutions, drying thoroughly, and preventing recurrence. Key steps include assessing damage, using protective gear, scrubbing affected areas, sanding if necessary, and maintaining proper ventilation and humidity levels to prevent future mold growth.
Here is a step-by-step guide you can follow to remove mold from hardwood floors:
Step 1: Identify And Eliminate Moisture Sources
The first crucial step in removing mold from hardwood floors is to identify and eliminate the sources of moisture. This involves a thorough inspection of the affected area and surrounding spaces. Look for visible signs of water damage, such as discoloration, warping, or soft spots in the wood. Check for leaks in plumbing, roofing, or windows that may be introducing moisture to the area. Pay close attention to areas prone to high humidity, such as basements, bathrooms, and kitchens.
Once potential moisture sources are identified, take immediate action to address them. This may involve repairing leaks, improving ventilation, or using dehumidifiers to reduce ambient humidity levels. In cases of poor subfloor preparation or improper installation, it may be necessary to consult with a professional to address these underlying issues.
Use a moisture meter to check if the wood is dry after addressing moisture sources. Ensure proper weather tightness, storm and run-off water management, and consider implementing vapor barrier sheets on the ground to prevent excess moisture from developing within or on the building envelope.
Step 2: Assess The Extent Of Mold Damage
After addressing moisture sources, the next step is to assess the extent of mold damage on your hardwood floors. Begin by visually inspecting the affected area, looking for signs of surface mold such as discoloration, fuzzy growth, or a musty odor. Use a flashlight to examine the floor from different angles, as mold can sometimes be difficult to spot in certain lighting conditions.
In addition to surface inspection, check for signs that the mold may have penetrated deeper into the wood. Look for any warping, cupping, or buckling of the floorboards, which can indicate moisture damage below the surface. Gently press on the affected areas to check for softness or sponginess, which may suggest more extensive damage. Note the color of the mold, which can appear in various shades including white, yellow, pink, brown, green, or black.
Determine if the mold manifests as delicate filaments or heavy surface films. If the mold appears to cover a large area (more than 10 square feet) or if there are signs of significant structural damage, it’s advisable to consult with a professional mold remediation specialist before proceeding with DIY removal methods.
Step 3: Prepare For Mold Removal
Before beginning the mold removal process, prepare the area and gather necessary supplies. Start by ensuring proper ventilation in the space. Open windows and doors to increase air circulation, and consider using fans to direct air out of the room. This will help reduce the concentration of mold spores in the air during cleaning.
Next, gather your safety equipment and cleaning supplies. Essential protective gear includes a respirator mask rated for mold spore filtration (N95 or higher), rubber gloves, and eye protection. For cleaning, you’ll need a variety of supplies such as a HEPA vacuum, soft-bristled brushes, clean cloths, a bucket, and your chosen cleaning solution.
Depending on the extent of the mold and your preferred cleaning method, you may also need items like sandpaper, wood cleaner, or a commercial mold remover specifically designed for use on wood surfaces. Ensure the room is well-lit to help you see all affected areas clearly.
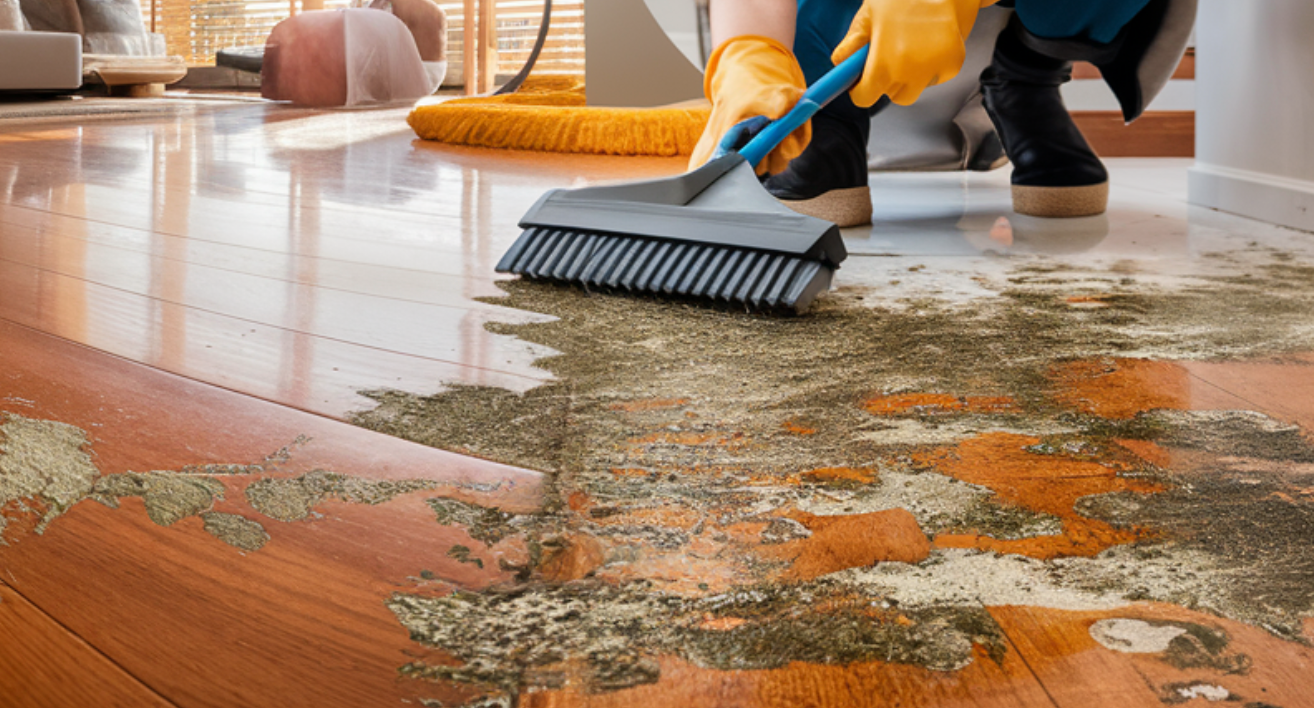
Step 4: Remove Surface Mold
With your preparation complete, you can begin the process of removing surface mold from your hardwood floors. Start by using a HEPA vacuum to carefully remove any loose mold spores and debris from the affected area.
Be sure to move slowly to avoid dispersing spores into the air. After vacuuming, you can proceed with one of several cleaning methods, depending on the extent of the mold and the condition of your floors.
For light mold growth, a solution of warm water and mild dish soap can be effective. For more stubborn mold, you may need to use a stronger solution.
Here’s a table of effective cleaning solutions to remove mold from hardwood floors:
| Cleaning Solution | Preparation | Application |
|---|---|---|
| Mild detergent | Mix with warm water | Apply with soft cloth or sponge |
| Bleach solution | 10 parts water to one part bleach. For stronger formulations, a mixture of one part household detergent, 10 parts bleach, and 20 parts warm water can be used. | Apply with brush, let sit for 10 minutes |
| Hydrogen peroxide | Use 3% solution | Spray on surface, let sit for 10 minutes |
| White vinegar | Use undiluted | Spray on surface, let sit for 1 hour |
| Borax solution | 1 cup borax to 1 gallon water | Apply with brush |
Whichever solution you choose, apply it to the affected area using a soft brush, cloth, or No. 1 steel wool. Gently scrub the area, being careful not to oversaturate the wood. After cleaning, use a clean, damp cloth to wipe away any residue, and then dry the area thoroughly with a clean towel. For stubborn mold, you may need to repeat the process or try a different cleaning solution.
Step 5: Address Deep-Set Mold
If the mold has penetrated deeper into the wood or if surface cleaning doesn’t completely remove it, more intensive measures may be necessary. In these cases, you may need to sand the affected area to remove the mold and any staining it has caused. Begin with a coarse-grit sandpaper (around 100-grit) to remove the top layer of wood along with the mold. Work carefully to avoid creating divots or uneven areas in the floor.
After the initial sanding, switch to a finer grit sandpaper (220-grit) to smooth out the surface. During sanding, spray the area with a diluted bleach solution to kill any remaining spores.
Once sanding is complete, vacuum the area thoroughly to remove all dust, and then wipe it down with a damp microfiber cloth. Allow the area to dry completely before applying a wood preservative or stain to match the rest of your floor.
Step 6: Dry And Restore The Floor
After cleaning and removing the mold, ensure the floor is completely dry to prevent future mold growth. Use fans and dehumidifiers to speed up the drying process, and allow at least 24 hours for the floor to dry thoroughly. Once dry, inspect the area again to ensure all signs of mold have been removed.
If the cleaning process has affected the finish of your hardwood floor, you may need to restore it. For small areas, you can try using a wood touch-up marker or a similar product to match the color. For larger areas or more significant damage, you may need to refinish the entire floor to ensure a uniform appearance. This typically involves sanding the entire floor, applying a new stain if desired, and then adding a protective finish.
Step 7: Implement Preventive Measures
The final step in the mold removal process is to implement preventive measures to avoid future mold growth. Here are key strategies to prevent mold recurrence:
- Maintain indoor humidity levels below 60% by using dehumidifiers if necessary.
- Improve ventilation in problem areas by using exhaust fans in bathrooms and kitchens, and ensure your HVAC system is functioning properly.
- Conduct regular cleaning and maintenance of your hardwood floors. Use a dry mop or vacuum with a soft brush attachment for routine cleaning, and avoid using excessive water when mopping.
- Address any spills or water damage immediately to prevent moisture from seeping into the wood.
- Consider applying a mold-resistant sealant to your hardwood floors for added protection, especially in areas prone to moisture.
- Maintain good site hygiene by managing wood waste and sealing wood storage areas.
- Store wood products with a moisture content below 20%.
- Regularly inspect for signs of moisture and mold, especially in areas prone to water exposure.
- For new construction or renovations, ensure all structural components are dry before closing in with insulation and drywall.
- In high-risk areas, consider applying anti-mold chemicals or using kiln-dried wood.
What Types Of Finishes Are More Resistant To Mold On Hardwood Floors?
The types of finishes that are more resistant to mold on hardwood floors include polyurethane (oil-modified polyurethane), Swedish finish (acid-curing urethane or conversion varnish), moisture-cure urethane, and water-based finishes. These finishes are known for their durability and moisture resistance, making them effective at preventing mold growth when properly maintained.
Polyurethane develops an amber tint over time, while Swedish finish is clear and fast-drying. Moisture-cure urethane is the toughest and offers non-yellowing options, and water-based finishes are fast-drying and resist yellowing. Penetrating sealers, while offering some moisture protection, are less suitable for areas with frequent spills.
Are Certain Types Of Hardwood More Resistant To Mold?
Yes, certain types of hardwood are more resistant to mold. The kiln-dried hardwood, which has a lower moisture content, is less susceptible to mold compared to green or reclaimed wood. While kiln drying effectively reduces the moisture content of wood to around 8-9.5%, making it less susceptible to mold, it does not guarantee mold prevention.
Factors such as storage conditions, ambient humidity, and exposure to moisture can still lead to mold growth on kiln-dried hardwood. Proper storage in well-ventilated areas with controlled humidity is crucial for maintaining the low moisture content achieved through kiln drying. Even kiln-dried wood can reabsorb moisture from its surroundings, potentially creating conditions conducive to mold growth. To minimize mold risk, it’s essential to maintain good airflow around the wood, avoid covering it with non-breathable materials, and regularly monitor its moisture content.
Restore Your Hardwood Floors: Get Professional Mold Removal Now!
In conclusion, effectively managing mold under hardwood floors requires a combination of identifying moisture sources, employing the right cleaning methods, and ensuring proper ventilation. Mold can significantly impact both the appearance and structural integrity of your floors, making timely and professional intervention crucial. For comprehensive and reliable mold removal services, consider Mold Removal Memphis. Our team is equipped with the expertise and tools to restore your hardwood floors and ensure a healthy living environment. Contact us today to schedule an inspection and safeguard your home against mold.